Tag Archives: netapp

EMC CLARiiON and Celerra Updates – Defining Unified Storage

Posted on by

This past week, during EMC World 2010 in Boston, EMC made several announcements of updates to the Celerra and CLARiiON midrange platforms.  Some of the most impressive were new capabilities coming to CLARiiON FLARE in just a couple short months.  Major updates to Celerra DART will coincide with the FLARE updates and if you are already running CLARiiON CX4 hardware, or are evaluating CX4 (or Celerra), you will want to check these new features out.  They will be available to existing CX4(120,240,480,960)/NS(120,480,960) systems as part of a software update.

Here’s a list of key changes in FLARE 30:

  • Unified management for midrange storage platforms including CLARiiON and Celerra today, plus RecoverPoint, Replication Manager and more in the future.  This is a true single pane of glass for monitoring AND managing SAN, NAS, and data protection and it’s built in to the platform.  “EMC Unisphere” replaces Navisphere Manager and Celerra Manager and supports multiple storage systems simultaneously in a single window. (Video Demo)
  • Extremely large cache (ie: FASTCache) – Up to 2TB of additional read/write cache in CLARiiON using SSDs (Video Demo)
  • Block level Fully Automated Storage Tiering (ie: sub-LUN FAST) – Fully automated assignment of data across multiple disk types
  • Block Level Compression – Compress LUNs in the CLARiiON to reduce disk space requirements
  • VAAI Support – Integrate with vSphere ESX for improved performance

These features are in addition to existing features like:

  • Seamless and non-disruptive mobility of LUNs within a storage array – (via Virtual LUNs)
  • Non-Disruptive Data Migration – (via PowerPath Migration Enabler)
  • VMWare Aware Storage Management – (Navisphere, Unisphere, and vSphere Plugins giving complete visibility  and self-service provisioning for VMWare admins (Video Demo) AND Storage Admins
  • CIFS and NFS Compression – Compress production data on Celerra to reduce disk space requirements including VMs
  • Dynamic SAN path load balancing – (via PowerPath)
  • At-Rest-Encryption – (via PowerPath w/RSA)
  • SSD, FC, and SATA drives in the same system – Balance performance and capacity as needed for your application
  • Local and Remote replication with array level consistency – (SnapView, MirrorView, etc)
  • Hot-swap, Hot-Add, Hot-Upgrade IO Modules – Upgrade connectivity for FC, FCoE, and iSCSI with no downtime
  • Scale to 1.8PB of storage in a single system
  • Simultaneously provide FC, iSCSI, MPFS, NFS, and CIFS access

All together, this is an impressive list of features for a single platform. In fact, while many of EMC’s competitors have similar features, none of them have all of them in the same platform, or leverage them all simultaneously to gain efficiency.  When CLARiiON CX4 and Celerra NS are integrated and managed as a single Unified storage system with EMC Unisphere there is tremendous value as I’ll point out below…

Improve Performance easily…

  • Install a couple SSD drives into a CLARiiON and enable FASTCache to increase the array’s read/write cache from the industry competive 4GB-32GB up to 2TB of array based non-volatile Read AND Write cache available to ALL applications including NAS data hosted by the array.
  • Install PowerPath on Windows, Linux, Solaris, AND VMWare ESX hosts to automatically balance IO across all available paths to storage.  PowerPath detects latency and queuing occuring on each path and adjusts automatically, improving performance at the storage array AND for your hosts.  This is a huge benefit in VMWare environments especially.
  • When VMWare releases the updated version of vSphere ESX that supports VAAI, ESX will be able to leverage VAAI support in the CLARiiON to reduce the amount of IO required to do many tasks, improving performance across the environment again.
  • Upgrade from 1gbe iSCSI to 10gbe iSCSI, or from 4gbe FiberChannel to 8gbe FiberChannel, without a screwdriver or downtime.
  • Provide NAS shared file access with block-level performance for any application using EMC’s MPFS protocol.

Improve Efficiency and cost easily…

  • Create a single pool of storage containing some SSD, some FC, and some SATA drives, that automatically monitors and moves portions of data to the appropriate disk type to both improve performance AND decrease cost simultaneously.
  • Non-disruptively compress volumes and/or files with a single click to save 50% of your disk space in many cases.
  • Convert traditional LUNs to more efficient Thin-LUNs non-disruptively using PowerPath Migration Enabler, saving more disk space.

Increase and Manage Capacity easily…

  • Add additional storage non-disruptively with SSD, FC, and SATA drives in any mix up to 1.8PB of raw storage in a single CLARiiON CX4.
  • Using FASTCache, iSCSI, FC, and FCoE connectivity simultaneously does not reduce total capacity of the system.
  • Expanding LUNs, RAID Groups, and Storage Pools is non-disruptive.
  • Migrating LUNs between RAID groups and/or Storage Pools is non-disruptive using built-in CLARiiON LUN Migration, as is migrating data to a different storage array (using PowerPath Migration Enabler)!
  • Balancing workload between storage processors is non-disruptive and at individual LUN granularity.

Protect your data easily…

  • Snapshot, Clone, and Replicate any of the data to anywhere with built in array tools that can maintain complete data consistency across a single, or multiple applications without installing software.
  • Maintain application consistency for Exchange, SQL, Oracle, SAP, and much more, even within VMWare VMs, while replicating to anywhere with a single pane-of-glass.
  • Encrypt sensitive data seamlessly using PowerPath Encryption w/RSA.

Maintain Flexibility…

  • While you can do all of these things quickly and simply, you still have the flexibility to create traditional RAID sets using RAID 0, 1, 5, 6, and 10 where you need highly predicable performance, or tune read and write cache at the array and LUN level for specific workloads.  Do you want read/write snapshots? How about full copy clones on completely separate disks for workload isolation and failure protection? What about the ability to rollback data to different points in time using snapshots without deleting any other snapshots?  EMC Storage arrays have been able to do this for a long time and that hasn’t changed.

There are few manufacturers aside from EMC that can provide all of these capabilities, let alone provide them within a single platform.  That’s the definition of simple, efficient, Unified Storage in my opinion.

NetApp and EMC: Exchange 2007 Replication

Posted on by

Exchange Replication

Building on the redundant storage project, we also wanted to replicate Exchange to a remote datacenter for disaster recovery purposes.  We’ve been using EMC CLARiiON MirrorView/A and Replication Manager for various applications up to now and decided we’d use NetApp/SnapMirror for Exchange to leverage the additional hardware as well as a way to evaluate NetApp’s replication functionality vs EMC’s.

On EMC Clariion storage, there are a couple choices for replicating applications like Exchange.
1.) Use MirrorView/Async with Consistency Groups to replicate Exchange databases in a crash-consistent state.
2.) Use EMC Replication Manager with Snapview snapshots and SANCopy/Incremental to update the remote site copy.

Similar to EMC’s Replication Manager, NetApp has SnapManager for various applications, which coordinates snapshots, and replica updates on a NetApp filer.

Whether using EMC RM or NetApp SM, software must be installed on all nodes in the Exchange cluster to quiesce the databases and initiate updates.  The advantage of Consistency groups with MirrorView is that no software needs to be installed in the host; all work is performed within the storage array.  The advantage of RM and SM/E is that database consistency is verified on each update and the software can coordinate restoring data to the same or alternate servers, which must be done manually if using MirrorView.

NetApp doesn’t support consistent snapshots across multiple volumes so the only option on a Filer is to use SnapManager for Exchange to coordinate snapshots and SnapMirror updates.

Our first attempt configuring SnapManager for Exchange actually failed when we ran into a compatibility issue with SnapDrive.  SnapManager depends on SnapDrive for mapping LUNs between the host and filer, and to communicate with the filer to create snapshots, etc.  We’d discussed our environment with NetApp and IBM ahead of time, specifically that we have Exchange CCR running on VMWare, with FiberChannel LUNs and everyone agreed that SnapDrive supports VMWare, Exchange, Microsoft Clustering, and VMWare Raw Devices.  It turns out that SnapDrive 6 DOES support all of this, but not all at the same time.  Specifically, MSCS clustering is not supported with FC Raw Devices on VMWare.  In comparison, EMC’s Replication Manager has supported this configuration for quite a while.  After further discussion NetApp confirmed that our environment was not supported in the current version of SnapDrive (6.0.2) and that SnapDrive 6.2, which was still in Beta, would resolve the issue.

Fast forward a couple months, SnapDrive 6.2 has been released and it does indeed support our environment so we’ve finally installed and configured SnapDrive and SnapManager.  We’ve dedicated the EMC side of the Exchange environment for the active nodes and the IBM for the passive nodes.  SnapManager snapshots the passive node databases, mounts them to run database verification, then updates the remote mirror using SnapMirror.

While SnapManager does do exactly what we need it to do, my experience with it hasn’t been great so far…  First, SnapManager relies on Windows Task Scheduler to run scheduled jobs, which has been causing issues.  The job will run on its schedule for a day, then stop after which the task must be edited to make it run again.  This happens in the lab and on both of our production Exchange clusters.  I also found a blog post about this same issue from someone else.

The other issue right now is that database verification takes a long time, due to the slow speed of ESEUTIL itself.  A single update on one node takes about 4 hours (for about 1TB of Exchange data) so we haven’t been able to achieve our goal of a 2-hour replication RPO.  IBM will be onsite next week to review our status and discuss any options.  An update on this will follow once we find a solution to both issues.  In the meantime I will post a comparison of replication tools between EMC and NetApp soon.

NetApp and EMC: ESX and Exchange 2007 CCR

Posted on by

The first application we tackled after deploying the NetApp system was Exchange 2007.  We had deployed Exchange 2007 recently, running in CCR clusters on VMWare ESX.  Since each node of a CCR cluster has it’s own copy of the database we wanted to put one node from each cluster onto the NetApp, leaving the other nodes on the Clariion.  This environment is entirely FiberChannel, no iSCSI deployed and as such the Exchange servers are using VMWare Raw Devices for the database and log disks.  This poses a problem that we didn’t discover until later which I will discuss in a future post about replicating Exchange with NetApp.

Re-Architecting the environment to fit the storage

The first thing we discovered was that neither IBM/NetApp nor EMC would support the same host HBAs zoned to multiple brands of storage.  So we had to split the ESX cluster into two clusters, one on each storage platform.  Luckily the Exchange environment was isolated on it’s own six node cluster so it was easy to split everything in half.

Next we learned that due to NetApp’s updated active/active mode with proxy paths in ONTap 7.3, VMWare ESX 3.x randomly selects paths when rescanning HBAs and will pick non-optimized paths to the LUNs.  This still works but is not ideal as it increases IO latency, causing the Filer to send autosupport emails periodically warning of the problem.  Installing the NetApp Host Utilities for ESX onto the ESX hosts themselves allows you to run a script that assigns persistent paths evenly across the HBAs.  The script works as advertised but as far as I can tell you have to run the script each time you add a new LUN to the ESX server.  It would be much better if it were more automated.

Actually, if you are running ESX4.0 the scenario changes since NetApp ONTap 7.3+, Clariion FLARE 26+, and ESX4 all support ALUA making this problem all but disappear and improving fabric resiliency. Unfortunately for us, ESX4 is still a bit new and hasn’t been rolled out into production yet.  NetApp also released tools for vCenter 4.0 that allow you to do the path assignment and other tasks from within vCenter rather than at the command line.  EMC also now has PowerPath available for ESX4.0 which will not only manage paths but load balance across all paths for increased performance and lower latency.

VirtualStorageGuy has blogged already about the NetApp/EMC/vSphere plug-ins and there is even a Powerpoint available.

Finally, during the sales process NetApp pushed their de-duplication features (A-SIS) quite a bit and stressed how much disk space we could save in a VMWare environment.  During deployment we were informed that if your VMs (VMDKs and VMFS) were not properly partition aligned de-duplication wouldn’t work well or at all.  Since this environment has several hundred VMs built over several years by many people, and aligning the system (C:) drive of a Windows VM is difficult, the benefit would be minimal for us.  Luckily NetApp has provided tools that can scan and align VMDKs without having to repartition the disks.  We have not tested this yet.  Partition Alignment is a best practice for ANY SAN storage system so we can’t fault NetApp for this problem; it’s just a fact of life.

But is it REALLY Redundant?

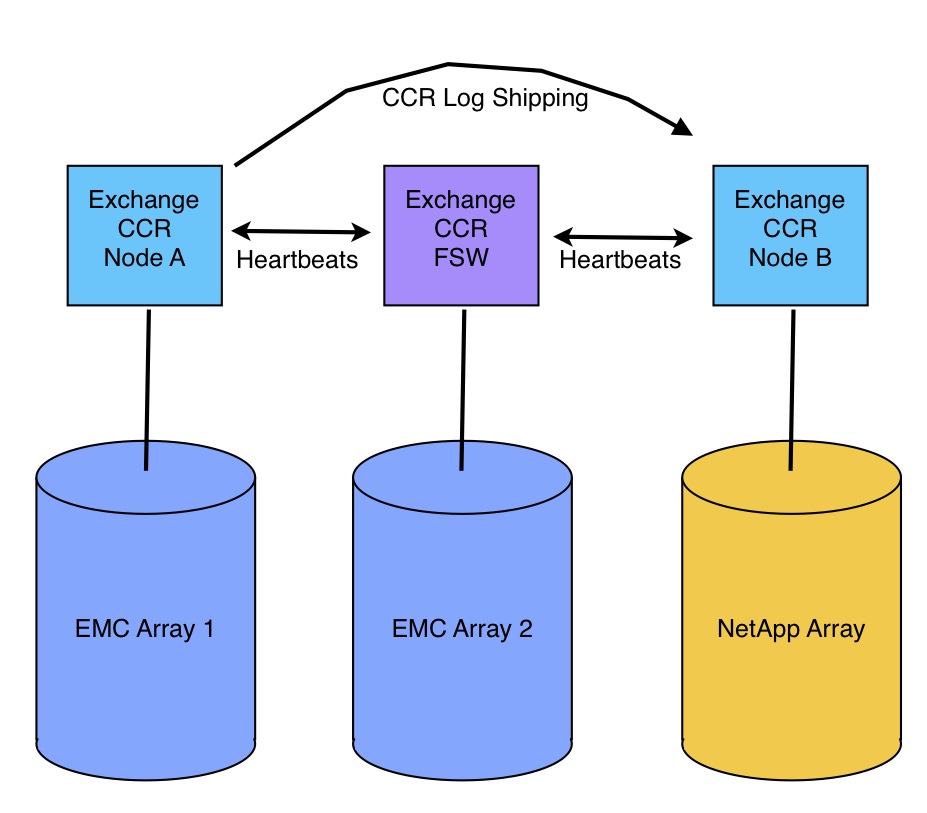
Even with two storage systems, with independent VMWare clusters, each hosting half of the Exchange cluster environment, a problem with either array could still take down and entire Exchange cluster.  This is due to the File Share Witness (FSW) component used in a Majority Node Set (MNS) cluster like Exchange CCR.  The idea behind the FSW in an MNS cluster is to prevent a condition known as Split Brain.  Since a MNS cluster does not have a quorum disk, it relies entirely on network communication between the nodes to determine cluster status and make decisions about which nodes should become active.  In the event that the two nodes lose communication with each other, each node will check for the FSW and if it is still available, it assumes that the other cluster node is down and proceeds to bring cluster resources online (if they weren’t already).  Without the FSW, both nodes would potentially go active and there could be issues with inconsistent data, etc.  This is the split-brain condition.

Typically, each cluster has a single FSW on a separate server (the CAS servers in our case).  With the redundancy storage model we moved to, the FSW became a single point of failure.  If we put the FSW on EMC storage with NodeA, and NodeB on the IBM/NetApp storage, a problem with the EMC array could take down both the cluster node AND the FSW at the same time.  The surviving cluster node on the IBM/NetApp array would go down or stay down to prevent split-brain since the FSW was not available.  Moving the FSW to the IBM/NetApp array presents the same problem on opposite side of the cluster.  Incidentally, we proved this problem in lab testing to be sure.  The solution is to move the FSW off of BOTH arrays, to either a dedicated physical server with internal disk, or a third storage array if you have one.  There was a second EMC array in production so we moved the FSW there.  In the new configuration, a complete outage of any single storage array would not take down the Exchange environment.

Crude diagram of the storage redundant Exchange CCR cluster

So far this new 3-way split environment is working fine, performance on the EMC and NetApp arrays is fine for Exchange.  Using the same number of disks on the NetApp array yields about twice as much usable space as the EMC due to RAID-DP vs RAID-10 but overall performance is similar.  Theoretically that means we could allow for more growth of the Exchange databases but in reality that is not always the case.  My next update will be about Exchange replication using SnapManager and SnapMirror and how that has effectively negated the remaining free space in the NetApp aggregate.

Capacity vs Performance: Thin Provisioning-Reclaiming Free Space

Posted on by

A comment about HDS’s Zero Page Reclaim on one of my previous posts got me thinking about the effectiveness of thin provisioning in general.  In that previous post, I talked about the trade-offs between increased storage utilization through the use of thin-provisioning and the potential performance problems associated with it.

There are intrinsic benefits that come with the use of thin provisioning.  First, new storage can be provisioned for applications without nearly as much planning.  Next, application owners get what they want, while storage admins can show they are utilizing the storage systems effectively.  Also, rather than managing the growth of data in individual applications, storage admins are able to manage the growth of data across the enterprise as a whole.

Thin provisioning can also provide performance benefits…  For example, consider a set of virtual Windows servers running across several LUNs contained in the same RAID group.  Each Windows VM stores its OS files in the first few GB of their respective VMDK files.  Each VMDK file is stored in order in each LUN, with some free space at the end.  In essence, we have a whole bunch of OS sections separated by gaps of no data.  If all VMs were booting at approximately the same time, the disk heads would have to move continuously across the entire disk, increasing disk latency.

Now take the same disks, configured as a thin pool, and create the same LUNs (as thin LUNs) and the same VMs.  Because thin-provisioning in general only writes data to the physical disks as it’s being written by the application, starting from the beginning of the disk, all of those Windows VMs’ OS files will be placed at the beginning of the disks.  This increased data locality will reduce IO latency across all of the VMs.  The effect is probably minor, but reduced disk latency translates to possibly higher IOPS from the same set of physical disks.  And the only change is the use of thin-provisioning.

So back to HDS Zero Page Reclaim.  The biggest problem with thin provisioning is that it doesn’t stay thin for long.  Windows NTFS, for example, is particularly NOT thin-friendly since it favors previously untouched disk space for new writes rather than overwriting deleted files.  This activity eventually causes a thin-LUN to grow to it’s maximum size over time, even though the actual amount of data stored in the LUN may not change.  And Windows isn’t the only one with the problem.  This means that thin provisioning may make provisioning easier, or possibly improve IO latency, but it might not actually save you any money on disk.  This is where HDS’s Zero Page Reclaim can help.  Hitachi’s Dynamic Provisioning (with ZPR) can scan a LUN for sections where all the bytes are zero and reclaim that space for other thin LUNs.  This is particularly useful for converting thick LUNs into thin LUNs.  But, it can only see blocks of zeros, and so it won’t necessarily see space freed up by deleting files.  Hitachi’s own documentation points out that many file systems are not-thin friendly, and ZPR won’t help with long-term growth of thin LUNs caused by actively writing and then deleting data.

Although there are ways to script the writing of zeros to free space on a server so that ZPI can reclaim that space, you would need to run that script on all of your servers, requiring a unique tool for each operating system in your environment.  The script would also have to run periodically, since the file system will grow again afterward.

NetApp’s SnapDrive tool for Windows can scan an NTFS file system, detect deleted files, then report the associated blocks back to the Filer to be added back to the aggregate for use by other volumes/LUNs.  The Space Reclamation scan can be run as needed, and I believe it can be scheduled; but, it appears to be Windows only.  Again, this will have to be done periodically.

But what if you could solve the problem across most or all of your systems, regardless of operating system, regardless of application, with real-time reclamation?  And what if you could simultaneously solve other problems?  Enter Symantec’s Storage Foundation with Thin-Reclamation API.  Storage Foundation consists of VxFS, VxVM, DMP, and some other tools that together provide dynamic grow/shrink, snapshots, replication, thin-friendly volume usage, and dynamic SAN multipathing across multiple operating systems.  Storage Foundation’s Thin-Reclamation API is to thin-provisioning what OST is to Backup Deduplication.  Storage vendors can now add near-real-time zero page reclaim for customers that are willing to deploy VxFS/VxVM on their servers.  For EMC customers, DMP can replace PowerPath, thereby offsetting the cost.

As far as I know, 3PAR is the first and only storage vendor to write to Symantec’s thin-API, which means they now have the most dynamic, non-disruptive, zero-page-reclaim feature set on the market.  As a storage engineer myself, I have often wondered if VxVM/VxFS could make management of application data storage in our diverse environment easier and more dynamic.  Adding Thin-Reclamation to the mix makes it even more attractive.  I’d like to see more storage vendors follow 3PAR’s lead and write to Symantec’s API.  I’d also like to see Symantec open up both OST and the Thin-Reclamation API for others to use, but I doubt that will happen.

NetApp and EMC: Startup and First Impressions

Posted on by

In the last post, I talked about a project I am involved in right now to deploy NetApp storage alongside EMC for SAN and NAS.  Today, I’m going to talk about my first impressions of the NetApp during deployment and initial configuration.

First Impressions

I’m going to be pretty blunt — I have been working with EMC hardware and software for a while now, and I’m generally happy with the usability of their GUIs.  Over that time, I’ve used several major revisions of Navisphere Manager and Celerra Manager, and even more minor revisions, and I’ve never actually found a UI bug.  To be clear, EMC, IBM, NetApp, HDS, and every other vendor have bugs in their software, and they all do what they can to find and fix them quickly, but I just haven’t personally seen one in the EMC UIs despite using every feature offered by those systems. (I have come across bugs in the firmware)

Contrast that with the first day using the new NetApp, running the latest 7.3.1.1L1 code, where we discovered a UI problem in the first 10 minutes.  When attempting to add disks to an aggregate in FilerView, we could not select FC disk to add.  We could, however, add SATA disk to the FC aggregate.  The only way to get around the issue was to use the CLI via SSH.  As I mentioned in my previous post, our NetApp is actually an IBM nSeries, and IBM claims they perform additional QC before their customers get new NetApp code.

Shortly after that, we found a second UI issue in FilerView.  When creating a new Initiator group, FilerView populates the initiator list with the WWNs that have logged in to it.  Auto-populating is nice but the problem is that FilerView was incorrectly parsing the WWN of the server HBAs and populating the list with NodeWWNs rather than PortWWNs.  We spent several hours trying to figure out why the ESX servers didn’t see any LUNs before we realized that the WWNs in the Initiator group were incorrect.  Editing the 2nd digit on each one fixed the problem.

I find it interesting that these issues, which seemed easy to discover, made it through the QC process of two organizations.  ONTap 7.3.2RC1 is available now, but I don’t know if these issues were addressed.

Manageability

As far as FilerView goes, it is generally easy to use once you know how NetApp systems are provisioned.  The biggest drawback in an HA-Filer setup is the fact you have to open FilerView separately for each Filer and configure each one as a separate storage system.  Two HA-Filer pairs? Four FilerView windows.  If you include the initial launch page that comes up before you get to the actual FilerView window, you double the number of browser windows open to manage your systems.  NetApp likes to mention that they have unified management for NAS and SAN where EMC has two separate platforms, each with their own management tools. EMC treats the two storage processors (SPs) in a Clariion in a much more unified manner, and provisioning is done against the entire Clariion, not per SP.  Further, Navisphere can manage many Clariions in the same UI.  Celerra Manager acts similarly for EMC NAS.  Six of one, half a dozen of the other some say, except that I find that I generally provision NAS storage and SAN storage at different times, and I’d rather have all of the controllers/filers in the same window than NAS and SAN in the same window.  Just my preference.

I should mention, NetApp recently released System Manager 1.0 as a free download.  This new admin tool does present all of the controllers in one view and may end up being a much better tool than FilerView.  For now, it’s missing too many features to be used 100% of the time and it’s Windows only since it’s based on MMC.  Which brings me to my other problem with managing the NetApp.  Neither FilerView nor System Manager can actually do everything you might need to do, and that means you end up in the CLI, FREQUENTLY.  I’m comfortable with CLIs and they are extremely powerful for troubleshooting problems, and especially for scripting batch changes, but I don’t like to be forced into the CLI for general administration.  GUI based management helps prevent possibly crippling typos and can make visualizing your environment easier.  During deployment, we kept going back and forth between FilerView and CLI to configure different things.  Further, since we were using MultiStore (vFilers) for CIFS shares and disaster recovery, we were stuck in the CLI almost entirely because System Manager can’t even see vFilers, and FilerView can only create them and attach volumes.

Had I not been managing Celerra and Clariion for so long, I probably wouldn’t have noticed the above problems.  After several years of configuring CIFS, NFS, iSCSI, Virtual DataMovers, IP Interfaces, Snapshots, Replication, and DR Failover, etc. on Celerra, as well as literally thousands of LUNs for hundreds of servers on Clariion, I don’t recall EVER being forced to use the CLI.  CelerraCLI and NaviCLI are very powerful, and I have written many scripts leveraging them, and I’ll use CLI when troubleshooting an issue.  But for every single feature I’ve ever used on the Celerra or Clarrion, I was able to completely configure from start to finish using the GUI.  Installing a Celerra from scratch even uses a GUI based installation wizard.  Comparing Clariion Storage Groups with NetApp Initiator groups and LUN maps isn’t even fair.  For MS Exchange, I mapped about 50 LUNs to the ESX cluster, which took about 30 minutes in FilerView.  On the Clariion, the same operation is done by just editing the Storage Group and checking each LUN, taking only a couple minutes for the entire process.

Now, all of the above commentary has to do with the management tools, UIs, and to some degree personal preferences, and does not have any bearing on the equipment or underlying functionality.  There are, of course, optional management tools like Operations Manager, Provisioning Manager, and Protection Manager available from NetApp, just as there is Control Center from EMC (which incidentally can monitor the NetApp) or Command Central from Symantec.  Depending on your overall needs, you may want to look at optional management tools; or, FilerView may be perfectly fine.

In the next post,  I’ll get into more specifics about how the Exchange 2007 CCR cluster turned out in this new environment, along with some notes on making CCR truly redundant.  I’ve also been working on the NAS side of the project, so I’ll also post about that some time soon.

NetApp and EMC: Real world comparisons

Posted on by

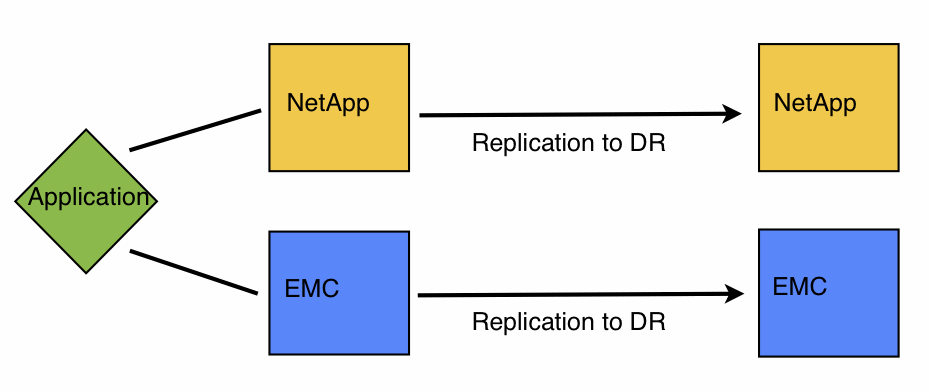
I’ve been tasked recently on a project to increase availability of applications through the use of multiple/disparate storage systems.  This environment has heavily invested in EMC Clariion and Celerra storage systems over the past few years and needed a non-EMC platform from which to build the second half of a redundant storage environment.  For various reasons I won’t go into here, we chose IBM nSeries as that second platform. (Since the IBM system is rebranded NetApp FAS, I will refer to this as a NetApp filer.)  I’ve been working on implementing the new equipment as well as integrating it into the Business Continuity strategy.

The overall strategy is to continue to use the EMC Clariion/Celerra systems for production and disaster recovery replication and split applications between and across the two storage platforms for local redundancy.  The NetApp will also perform disaster recovery replication for some of the applications.  Here’s a really simple diagram that might help if the description is confusing:

EMC and NetApp Redundancy

EMC and NetApp Redundancy

Now this may sound easy, but it is, in fact, NOT straightforward.  This strategy requires close coordination with application owners and careful planning.  As we move forward on this project, I’ll talk about various idiosyncrasies, caveats, and problems we’ve faced, how we got around them, and I’ll also talk a lot about the differences between the Clariion/Celerra and NetApp platforms’ features and functionality, application support, and manageability.  These comparisons will include using both systems with FiberChannel connections as well as CIFS/NFS NAS, all in conjunction with DR replication and failover.

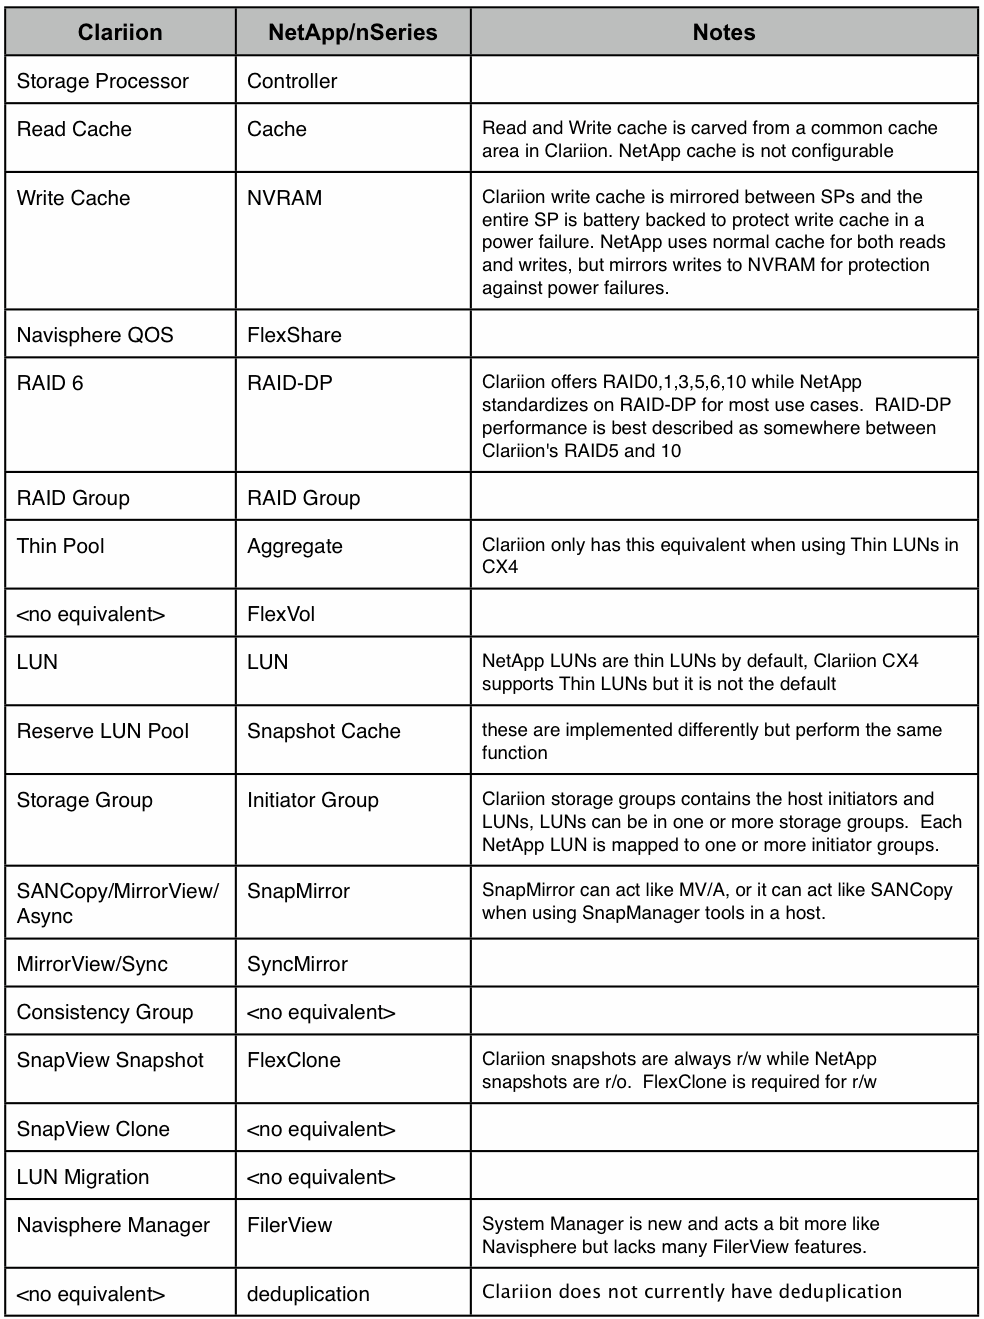
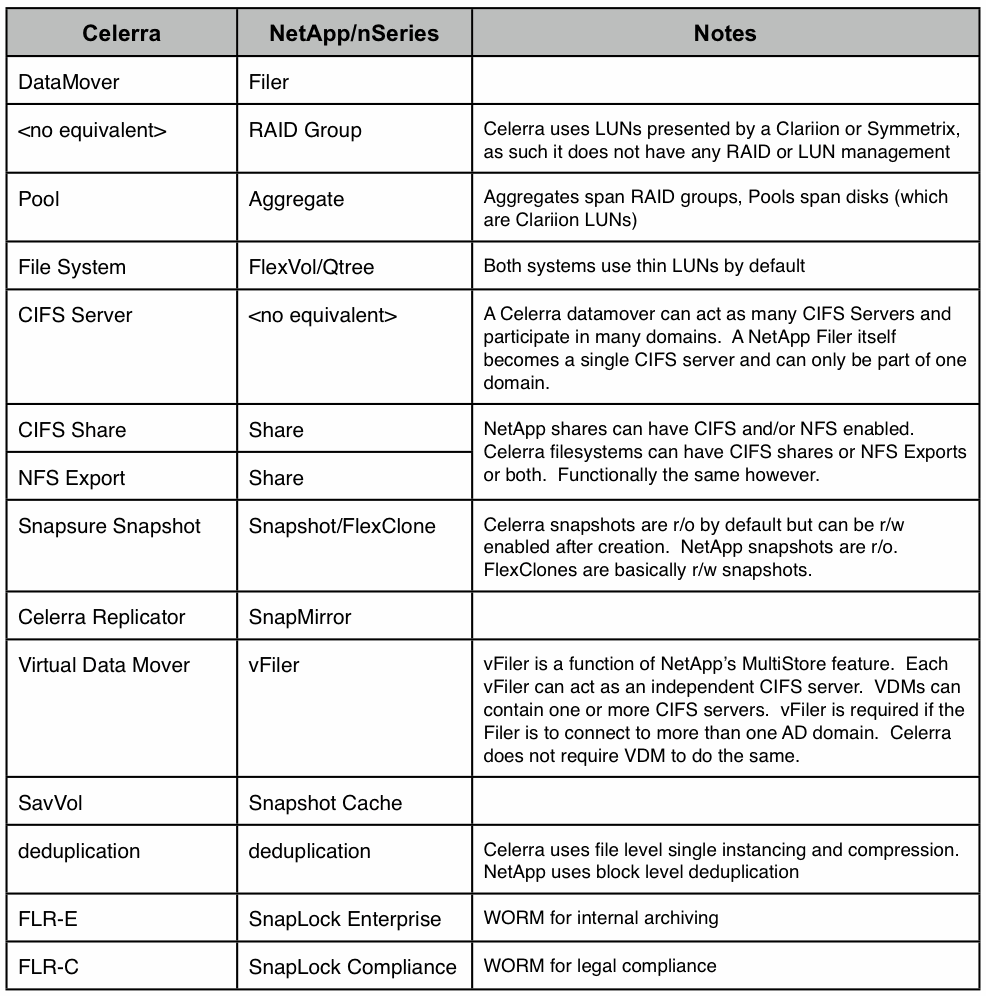
To start off, I figure we should compare some of the terminology between EMC and NetApp systems.  Some terms don’t directly translate, but I matched them up as close as I could and noted where there is no equivalent.   Below are two tables: one for Block Storage, and the other for NAS Storage.  Click on them to see full size versions.

EMC-NetApp Block Storage Terminology table

EMC-NetApp Block Storage Terminology

EMC-NetApp NAS Storage Terminology

EMC-NetApp NAS Storage Terminology

In the next update, I’ll start talking about the deployment itself.  The point of these articles is to discuss the differences, advantages, and disadvantages of each platform so that you can understand how each one might work in your environment.  I do not intend to disparage either platform or vendor.  I will try to be vendor agnostic as much as possible, and I do feel like I have a somewhat unique position of comparing new and recent hardware and firmware from both vendors, in the same production capacities, simultaneously, in the same environment.  I am NOT comparing old ONTap code to new FLARE/DART code or vise-versa, nor am I comparing old Clariion CX hardware to new NetApp/IBM hardware, etc.

Stay tuned!

Backup Everything – DR and Offsite copies

Okay, now that I’ve talked about backing up the datacenter with NetBackup and DataDomain, and backing up remote sites with NetBackup and PureDisk, it’s time to discuss how to get all that data offsite to protect against a catastrophic event at the datacenter.

As mentioned before we have a primary datacenter with the majority of our systems including the backup environment, and a secondary “disaster recovery” datacenter to which we replicate tier 1 applications for business continuity purposes.  Since we really wanted to get away from using tapes and instead store the backups on disk in our datacenter we have a second backup environment in the DR datacenter and we replicate the backup data there.

There are several ways to replicate backup data between two sites but most of them have drawbacks..

1.) Duplicate the backup data from disk to tape and ship the tapes to the remote site to be ready for restore.  This is the easiest and probably cheapest way.  But there’s that pesky tape yet again with it’s media handling and shipping.  And restore could take a while since you have to deal with restoring the catalog from tape, then importing the media, etc.

2.) Duplicate the backup data directly from the local disk to the disk in the second location across the WAN.  This is not very feasible with any significant amount of data because every byte of data that is backed up in the datacenter has to be copied across the much slower WAN.  It could take many days to duplicate a single nights’ backup.  You’d also need a special Catalog backup job that wrote to a storage device across the WAN.  The good here is that the backup application knows there is a second copy of the data and knows how to find it.

3.) Replicate the data with the backup storage devices’s native replication.  Whether it’s PureDisk, Avamar, or DataDomain, pretty much every source-based or target-based deduplication solution has replication built in that leverages the deduplication to reduce the amount of data that traverses the WAN.  The advantage here is that you can have a copy of all of your backup data in a second location in a much shorter time than a traditional copy process.  If your deduplication device stores the data with 10:1 compression, then your WAN usage is reduced by 90%.  The savings in practice is actually better than that.  The drawback is that the backup application (hence the catalog) has no knowledge that there is a second copy of the backup data and after recovering the catalog, you would need to import all of the disk-based media which could take a long time.

4.) Leverage NetBackup Lifecycle Policies with Symantec OpenSTorage (OST) and an OST-capable backup storage system like DataDomain or PureDisk(with PDDO).  Basically this has all the advantages of option #2, where it is a catalog-aware duplication, combined with the advantages of WAN bandwidth savings from option #3.  Time to copy the data offsite is much shorter due to deduplication, and time to restore is very fast since the data is already in the catalog and available on the disk.

OpenSTorage (OST) is a network protocol that Symantec developed to interface with disk-based backup storage systems and DataDomain was an early adopter of OST.  OST allows Netbackup to control replication between OST-capable storage systems and keep track of the replicated copies of backups in the Catalog just as if Netbackup had made both copies itself.  OST is also used as the protocol to send the backup data to the storage device as opposed to CIFS/NFS or VTL.  DataDomain appliances support OST as does PureDisk when used in conjunction with the PDDO option discussed earlier.   In NetBackup, replication controlled by OST is called “optimized duplication” and is controlled primarily through Lifecycle Policies.

Traditionally, when creating NetBackup job policies, the administrator will specify a Storage Unit (either a disk storage unit or a tape library or drive) that the job policy will send backups to.  Lifecycle Policies are treated like Storage Units as far as the Job Policy is concerned but the Lifecycle Policy includes a list of storage units, each with it’s own data retention, that the backup data must be stored onto in order for NetBackup to consider the data fully protected.  Typically there is a “Backup” target which is where the actual data coming from the client is stored, followed by one or more “Duplication” targets.  After the backup job completes, NetBackup will copy the backup data from the “backup” location to all of the “duplication” locations.  This works with pretty much any type of storage and you can mix and match tape and disk in the same policy.  Since these are duplication operations, NetBackup will read ALL of the data from the backup location, and write ALL of the data to each duplication location.  This can take a long time even on the local network and trying to offsite a lot of data over the WAN is not very feasible.

With OST, the lifecycle policy operates exactly the same except that it uses “optimized duplication”, instructing the storage device to copy the file rather than performing the copy through a media server.  So in the case of DataDomain, OST issues the command to the DDR, the DDR then copies the file to the second DDR in the remote site and gets all the benefits of deduplication and compression between the two.  The media server doesn’t actually do any work.  Once the duplication is complete, the DDR notifies NetBackup and the catalog is updated with a record of the second copy of the backup.  Lifecycle Policies are fully automated, you can’t even restart a failed duplication, so in the event of a transient failure like a WAN hiccup NetBackup will retry a duplication job forever until it succeeds in order to satisfy the lifecycle policy.

As you can probably surmise, this is REALLY nice for a tape-less backup environment.  Our DD690 offsites over 9TB of data every night DURING the backup window.  When the last backup job completes, the offsite copies are complete within 30 minutes.  And there is absolutely no management of the offsite process or duplication jobs besides configuring the lifecycle policies up front.  The drawback to regular Netbackup lifecycle policies is that all duplications are taken from the initial backup copy which limits what you can do with the copies.

Enter NetBackup 6.5.4…  Despite the small 6.5.3 -> 6.5.4 version number change, the 6.5.4 release had quite a few new features added.  The biggest one was a revamping of the Lifecycle Policy engine to allow for nested duplications.  Now you can create a copy of a backup, then create multiple copies from the copy, then create copies from the other copies.  Why is this useful?

Remember when I discussed using NetBackup with PDDO to backup remote sites?  Well the data backed up from the remote site is all stored in the primary datacenter and we need to get the second copy to the DR datacenter.  Plus, we wanted to have a small cache of recently backed up data sitting on the remote media server for fast restore.  Well, nested lifecycle’s are the key.  The lifecycle writes the initial backup copy onto the media server’s local disk which is configured as a capacity-managed staging area (ie: it stores as much as it can and expires data when it needs more space for new backups).  The lifecycle then creates a duplicate of the backup onto the PureDisk storage unit in the primary datacenter.  Since bandwidth to the remote site is very limited we don’t want to copy it from the remote site twice so the lifecycle has a second duplication nested under the first to copy it to the DR datacenter.  The source of the second copy is the primary datacenter copy, NOT the remote media server copy.

Where else can we use this?  Let’s consider our tape-less datacenter backups..  We backup the clients to the DataDomain in our primary datacenter, then using a lifecycle policy and OST, create a copy on the DataDomain in the DR datacenter.  If we also wanted to have a tape copy for long term archive or vaulting we could create a nested duplication to make a copy to a tape library in the DR datacenter from the disk copy that is also in the DR datacenter.  Without nested lifecycle’s the only workable solution would be to create the tape in the primary datacenter.  Every copy of the backup made via the lifecycle policy whether it is using OST or not is maintained by the catalog and easily used for restore.  Furthermore, using OST as the protocol between Netbackup and DataDomain actually increases throughput to the DataDomain DDR systems by approximately 2X vs VTL/CIFS/NFS.

Now to the caveats.. Optimized duplication via OST is only available when you are using OST as the protocol between the media server and the storage unit.  This means it doesn’t work with VTL even when the DataDomain IS the VTL.  OST only works over an ethernet network which is why we skipped VTL completely and used 10gbps networks for the DDR connections.  We even skipped VTL/Tape for the NAS systems, connected them directly to the 10gbps network and use 3-way NDMP to backup them up over the network, through the media servers, to the DataDomain.  We get the benefit of lifecycle policies, optimized duplication, and I may have mentioned before–no pesky tape even with NDMP/NAS backups.  And the interesting thing is that with the 10gbps connection, the NDMP dumps are faster than direct fiber to tape.

There were other enhancements to NetBackup 6.5.4 centered around OST functionality but the lifecycle policy improvements were huge in my opinion.

To cover the catalog replication, we run Netbackup hot catalog backups to a CIFS share that is hosted by the DataDomain.  The DDR replicates that share using DataDomain native replication to the DDR in the DR datacenter where the same data is available via a similar CIFS share.  Our standby Netbackup master server is already connected to the CIFS share for catalog restore and connected to the DDR via OST.  A single operation restores the catalog from the replicated copy.  In a real disaster we can begin restoring user data within 30 minutes from the DR datacenter.

Capacity vs. Performance: De-duplication

Posted on by

This is the 3rd part of a multi-part discussion on capacity vs performance in SAN environments.  My previous post discussed the use of thin provisioning to increase storage utilization.  Today we are going to focus on a newer technology called Data De-Duplication.

Data De-Duplication can be likened to an advanced form of compression.  It is a way to store large amounts of data with the least amount of physical disk possible.

De-duplication technology was originally targeted at lowering the cost of disk-based backup.  DataDomain (recently acquired by EMC Corp) was a pioneer in this space.  Each vendor has their own implementation of de-duplication technology but they are generally similar in that they take raw data, look for similarities in relatively small chunks of that data and remove the duplicates.  The diagram below is the simplest one I could find on the web.  You can see that where there were multiple C, D, B, etc blocks in the original data, the final “de-duplicated” data has only one of each.  The system then stores metadata (essentially pointers) to track what the original data looked like for later reconstruction.

Image from eWeek Article

The first and most widely used implementations of de-dupe technology were in the backup space where much of the same data is being backed up during each backup cycle and many days of history (retention) must be maintained.  Compression ratios using de-duplication alone can easily exceed 10:1 in backup systems.  The neat thing here is that when the de-duplication technology works at the block-level (rather than file-level) duplicate data is found across completely disparate data-sets.  There is commonality between Exchange email, Microsoft Word, and SQL data for example.  In a 24 hour period, backing up 5.7TB of data to disk, the de-dupe ratio in my own backup environment is 19.2X plus an additional 1.7X of standard compression on the post de-dupe’d data, consuming only 173.9GB of physical disk space.  The entire set of backed up data, totaling 106TB currently stored on disk, consumes only 7.5TB of physical disk.  The benefits are pretty obvious as you can see how we can store large amounts of data in much less physical disk space.

There are numerous de-duplication systems available for backup applications — DataDomain, Quantum DXi, EMC DL3D, NetApp VTL, IBM Diligent, and several others.  Most of these are “target-based” de-duplication systems because they do all the work at the storage layer with the primary benefit being better use of disk space.  They also integrate easily into most traditional backup environments.  There are also “source-based” de-duplication systems — EMC Avamar and Symantec PureDisk are two primary examples.  These systems actually replace your existing backup application entirely and perform their work on the client machine that is being backed up.  They save disk space just like the other systems but also reduce bandwidth usage during the backup which is extremely useful when trying to get backups of data across a slow network connection like a WAN.

So now you know why de-duplication is good, and how it helps in a backup environment.. But what about using it for primary storage like NAS/SAN environments?  Well it turns out several vendors are playing in that space as well.  NetApp was the first major vendor to add de-duplication to primary storage with their A-SIS (Advanced Single Instance Storage) product.  EMC followed with their own implementation of de-duplication on Celerra NAS.  They are entirely different in their implementation but attempt to address the same problem of ballooning storage requirements.

EMC Celerra de-dupe performs file-level single-instancing to eliminate duplicate files in a filesystem, and then uses a proprietary compression engine to reduce the size of the files themselves.  Celerra does not deal with portions of files.  In practice, this feature can significantly reduce the storage requirements for a NAS volume.  In a test I performed recently for storing large amounts of Syslog data, Celerra de-dupe easily saved 90% of the disk space consumed by the logs and it hadn’t actually touched all of the files yet.

NetApp’s A-SIS works at a 4KB block size and compares all data within a filesystem regardless of the data type.  Besides NAS shares, A-SIS also works on block volumes (ie: FiberChannel and iSCSI LUNs) where EMC’s implementation does not.  Celerra has an advantage when working with files which contain high amounts of duplication in very small block sizes (like 50 bytes) since NetApp looks at 4KB chunks.  Celerra’s use of a more traditional compression engine saves more space in the syslog scenario but NetApp’s block level approach could save more space than Celerra when dealing with lots of large files.

The ability to work on traditional LUNs presents some interesting opportunities, especially in a VMWare/Hyper-V environment.  As I mentioned in my previous post, virtual environments have lots of redundant data since there are many systems potentially running the same operating system sharing the disk subsystem.  If you put 10 Windows virtual machines on the same LUN, de-duplication will likely save you tons of disk space on that LUN.  There are limitations to this that prevent the full benefits from being realized.  VMWare best practices require you to limit the number of virtual machine disks sharing the same SAN lun for performance reasons (VMFS locking issues) and A-SIS can only de-dupe data within a LUN but not across multiple LUNs.  So in a large environment your savings are limited.  NetApp’s recommendation is to use NFS NAS volumes for VMWare instead of FC or iSCSI LUNs because you can eliminate the VMFS locking issue and place many VMs on a single very large NFS volume which can then be de-duplicated.  Unfortunately there are limits on certain VMWare features when using NFS so this may not be an option for some applications or environments.  Specifically, VMWare Site Recovery Manager which coordinates site-to-site replication and failover of entire VMWare environments does not currently support NFS as of this writing.

When it comes to de-duplication’s impact on performance it’s kind of all over the map.  In backup applications, most target based systems either perform the work in memory while the data is coming in or as a post-process job that runs when the backups for that day have completed.  In either case, the hardware is designed for high throughput and performance is not really a problem.  For primary data, both EMC and NetApp’s implementations are post-process and do not generally impact write performance.  However, EMC has limitations on the size of files that can be de-duplicated before a modification to a compressed file causes a significant delay.  Since they also limit de-duplication to files that have not been accessed or modified for some period of time, the problem is minimal in most environments.  NetApp claims to have little performance impact to either read or writes when using A-SIS.  This has much to do with the architecture of the NetApp WAFL filesystem and how A-SIS interacts with it but it would take an entirely new post to describe how that all works.  Suffice it to say that NetApp A-SIS is useful in more situations than EMC’s Celerra De-duplication.

Where I do see potential problems with performance regardless of the vendor is in the same situation as thin provisioning.  If your application requires 1000 IOPS but you’ve only got 2 disks in the array because of the disk space savings from thin-provisioning and/or de-duplication, the application performance will suffer.  You still need to service the IOPS and each disk has a finite number of IOPS (100-200 generally for FC/SCSI).  Flash/SSD changes the situation dramatically however.

Right now I believe that de-duplication is extremely useful for backups, but not quite ready for prime-time when it comes to primary storage.  There are just too many caveats to make any general recommendations.  If you happen to purchase an EMC Celerra or NetApp FAS/IBM nSeries that supports de-duplication, make sure to read all the best-practices documentation from the vendor and make a decision on whether your environment can use de-duplication effectively, then experiment with it in a lab or dev/test environment.  It could save you tons of disk space and money or it could be more trouble than it’s worth.  The good thing is that it’s pretty much a free option from EMC and NetApp depending on the hardware you own/purchase and your maintenance agreements.

Capacity vs. Performance : Thin Provisioning

Posted on by

In my previous post, where I discussed the problem of unusable (or slack) disk space on a SAN, I promised a follow-up with techniques on how to increase storage utilization.  I realized that I should discuss some related technologies first and then follow that up with how to put it all together.  So today I start by talking about Thin Provisioning.  I will then follow up with an explanation of De-Duplication and finally talk about how to use multiple technologies together to get the most use out of your storage.

So what is Thin Provisioning?  It is a technology that allows you to create LUNs or Volumes on a storage device such that the LUN/Volume(s) appear to the host or client to be larger than they actually are.   In general, NAS clients and SAN attached hosts see “Thin Provisioned” LUNs just as they see any other LUN but the actual amount of disk space used on the storage device can be significantly smaller than the provisioned size.  How does this help increase storage utilization?  Well, with thin provisioning you provide applications with exactly the storage they want and/or need but you don’t have to purchase all of the disk capacity up front.

Let’s start with a comparison of using standard LUNs vs thin LUNs with a theoretical application set:

Say we have 3 servers, each running Windows Server.  The operating system partition is on local disk and application data drives are on SAN.  Each server runs an application that collects and stores data over time and the application owner expects that over the next year or so the data will grow to 1TB on each server.  In this particular case we also know that the application’s performance requirements are relatively low.

With traditional provisioning we might create 3 LUNs that are 1TB each and present them to the servers.  This provides the application with room for the expected growth.  Using 300GB FC disks we can carve out three 4+1 RAID5 sets, create one LUN in each and it would work fine.  Alternatively we could use wide striping (ie: a MetaLUN on EMC Clariion) and put all three LUNs on the same 15 disks.  Either way we’ve just burned 15 disks on the storage array based on uncertain future requirements.  If we were stingier with storage we could create smaller LUNs (500GB for example) and use LUN expansion technology to increase the size when the application data fills the disk to that capacity.

In the Thin Provisioning world we still create three 1TB LUNs but they would start out by taking no space.  The pool of disk that the LUNs get provisioned from doesn’t even need to have 3TB of capacity.  As the application data grows over the next 12 months or longer the pool size only needs to grow to accommodate the actual amount of data stored.  Depending on the storage array, we can add disks to the pool one at a time.  So on day one we start with 3 disks in the pool, and then add additional disks one by one throughout the year.  We can then create additional LUNs for other applications without adding disks.  As we add disks to the pool, we expand the capacity available for all of the LUNs to grow (up to each LUN’s maximum size) and we increase performance for ALL of the LUNs in the pool since we are adding spindles.  The real-world benefits come as we consolidate numerous LUNs into a single disk pool.

The nice thing about this approach is that we stop managing the size of individual LUNs and just manage the underlying disk pool as a whole.   And the cost-per-GB for SAN disk constantly goes down so we can spend only what we have to today, and when we add more later it will likely be a little cheaper.  Disk capacity utilization will be much higher in a thin model compared with the traditional/thick model.

The story gets even better in a virtual server environment such as with MS Hyper-V or VMWare ESX.  First, the virtual server OS drives are on the SAN in addition to the application data, and there can be multiple virtual disks on the same LUN.  Whether physical or virtual, we need to maintain some free space in the disks to keep applications running, plus with virtual systems we need some free space on the LUN for features of the virtualization technology like snapshots.  The net effect is that in a virtualized environment, disk utilization never gets much above 50% when slack space at both the virtual layer and inside the virtual servers is considered.  With thin provisioning we could potentially store twice the number of virtual servers on the same physical disks.

There are caveats of course.  Maintaining performance is the primary concern.  Whether used in a thick LUN or thin LUN, each disk has a specific amount of performance.   Thin provisioning has no effect on the amount of IOPS or bandwidth the application requires nor the amount of IOPS the physical disk can handle.  So even if thin provisioning saves 50% disk space in your environment, you may not be able to use all of that reclaimed space before running into performance bottlenecks.  If the storage array has QOS features (ie: EMC Clariion NQM) it is possible to prioritize the more important applications in your disk pool to maintain performance where it matters.

Other problems that you may encounter have to do with interoperability.  For starters, some applications are not “thin-friendly”; ie: they write data in such a way as to negate any benefit that thin provisioning provides.  Also, while many storage arrays support thin provisioning, each has different rules about the use of thin LUNs.  For example, in some scenarios you can’t replicate thin LUNs using native array tools.  It pays to do your homework before choosing a new storage array or implementing thin provisioning.

I didn’t cover thin provisioning in NAS environments directly but the feature works in the same manner.  Thin volumes are provisioned from pools of storage and users/clients see a large amount of available disk space even if the disk pool itself is very small.  Since NAS is traditionally used for user home directories and departmental shares, absolute performance is usually not as much of a concern so thin provisioning is much easier to implement and in many cases is the default behavior or simply a check box on NAS appliances like EMC Celerra or NetApp FAS.

Thin provisioning is a powerful technology when used where it makes sense.  In my next post I’ll explain de-duplication technology and then talk about how these technologies can be used together plus some workarounds for the caveats that I’ve mentioned.