Category Archives: solutions

What your Nest could have told you but didn’t

Posted on by 10 comments

So you picked up a Nest at the store, or online, because you realized (or thought maybe) that you could save some money on your heating or cooling bills, and/or the possibility of remote controlling your home HVAC from your phone was pretty slick.

Now I won’t really spend much time on the energy/cost savings (or possibly lack thereof) related to using a Nest vs. any other programmable thermostat but suffice it to say I’m dubious as to whether Nest will actually save me any money in its lifetime. But that’s not why I got it.. Being able to remotely set the furnace to away and bring it back to life as needed from my mobile phone is interesting enough to me. Combined that with energy consumption statistics and I can see at least enough benefit to warrant trying it out.

Further, I am supporting a startup project called Ecovent which integrates with Nest and will allow individual control of the temperature in each room of our house. No more cold office with an overheated living room…

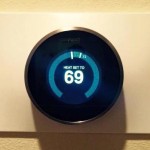
Anyway, I picked up the Nest while upgrading my wife’s mobile phone because I was able to bundle my items together for a little discount. At home I spent just under 10 minutes installing it, it really IS easy! Perfect, looks great, and seems to work just fine. It was evening so I set the temp to 60˚F and left it alone for the night.nest-online

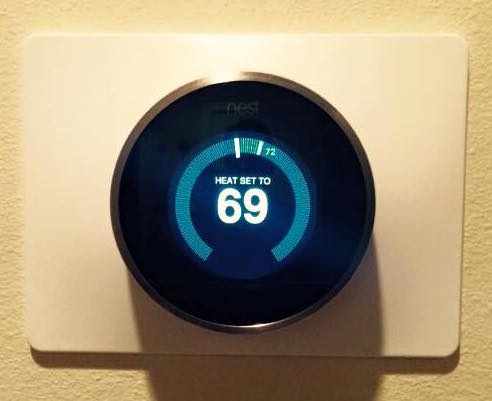
The next morning I set the furnace to 69˚F from my phone before I got out of bed and started getting ready for the day. From 7am until about 10am the furnace turned on and off, on and off, repeatedly, but the house never got any warmer.   The Nest itself seemed fine with no errors on screen. I turned the knob up a bit and it said it was heating but still same result. I gave up on it for most of the day thinking maybe it was learning how quickly or slowly the furnace raises the temperature. WRONG!

Later in the evening it was still not working so I Google’d around a bit (yes I use Google so I can use the big G) for this issue and found a few notes in discussion forums. I didn’t find anything useful on Nest’s website (although I searched today, and found this KB article) itself regarding this issue, and calling customer support is always my last resort because I’ve found that most of the time customer support organizations don’t know their own product much better than I can figure out on my own with the Internet at my disposal.

What I did find on the discussion forums indicated that the problem was that there wasn’t enough power available in the control circuit and/or board to fire up the gas burners. And the furnace is designed to shut down the fan and heat cycle after two minutes if the burners haven’t ignited. I also saw several Nest owners comment that they had to call out HVAC repair technicians to figure out what the problem was, presumably at a fairly hefty cost. The good news is that I was able to determine the cause and fix the problem myself, and I’ll describe that here. It’s quite simple, however the caveat is that your house may not have the thermostat wiring in the walls that you need in order to fix it, which means running a new wire, decidedly more involved than if you already have the wiring in place.

First, the ultimate issue is that the Nest consumes more power than a typical thermostat. It has a color screen with backlighting, an actual CPU running an operating system, and a WiFi radio. It also has a rechargeable battery embedded to keep it running when you remove it from its wall base, or when the power is out.   The power to run the Nest AND charge the battery comes from the 24VAC Control board in the furnace. Since the Nest uses more current (amperage) than normal and that current comes from the same power source as the current required to turn on relays for the fan and ignite the burners, open gas valves, this is where we get into problems.

The Sequence goes like this…

  1. The Nest is using power all the time
  2. If the battery is still charging for some reason it’s using even more power
  3. At some point Nest decides it’s too cold and sends the Heat signal to the furnace, sending this signal takes some more power
  4. After the furnace fan has been running for a few seconds it’s time to ignite the burner.  This takes a bit more power (close relay to heat up igniter, close relay to open gas valves)
  5. But now the power in the circuits going through the Nest doesn’t have enough current left to do this, and the voltage has dropped as a result so the relays don’t actually close… and the burners never get gas and/or the igniter doesn’t heat up.
  6. Two minutes pass and the furnace senses that the burners still aren’t lit and shuts down.
  7. Lather, Rinse, Repeat

You can determine very quickly with Nest if this is going on by looking at the technical data screen..

nest-power-bad

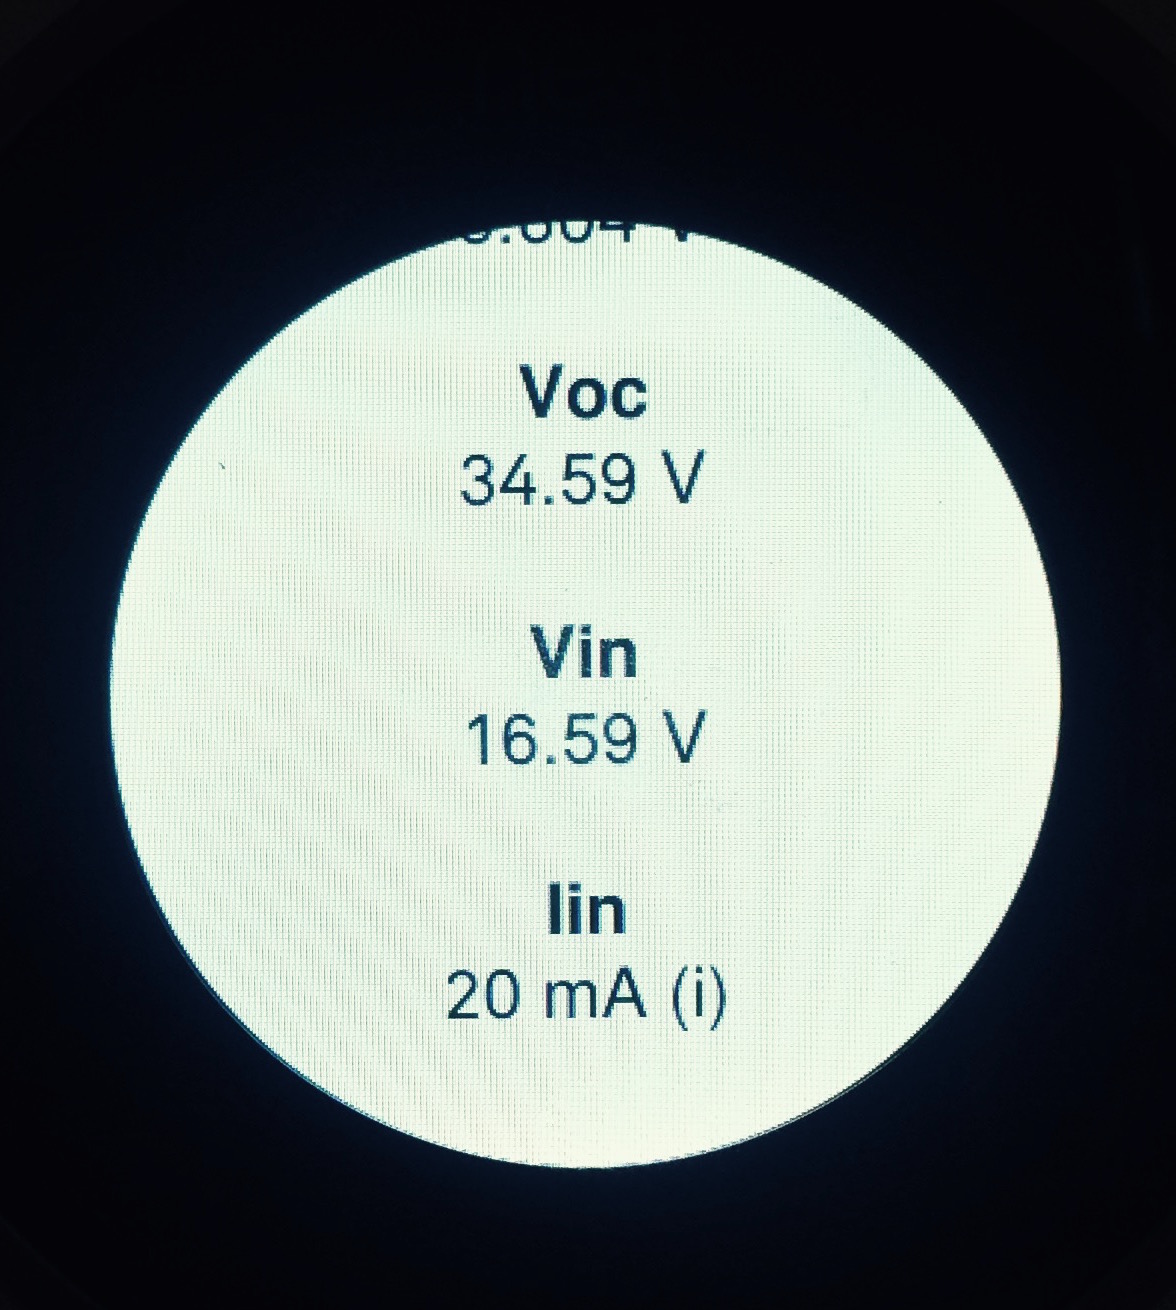
Notice the Voc and Vin are wildly different.. this means that the AC sine-wave is fluctuating, ie: voltage is dropping. And the Lin is a current measurement showing 20mA.. According to online discussions this should be around 100ma.

The fix for this is to add power. The most common method of doing that is to connect the blue “C” common wire between the furnace and the Nest. This makes it so that the Nest doesn’t steal/rob it’s power from the same lines that are used to control the heat and fan.

furnace-wiring-fixed-blue

nest-wiring-fixed-blue

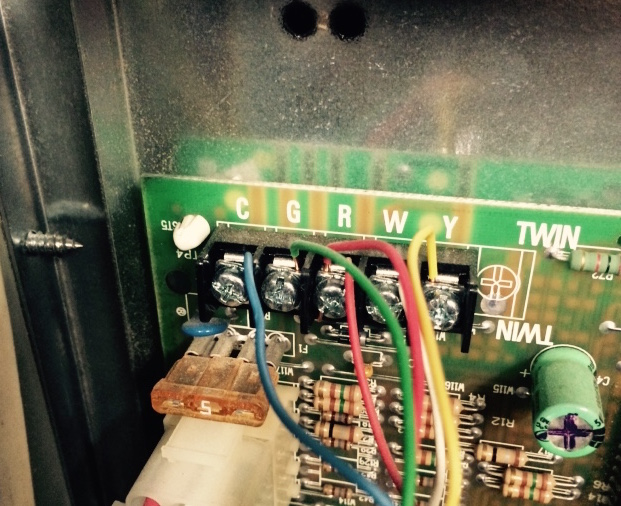
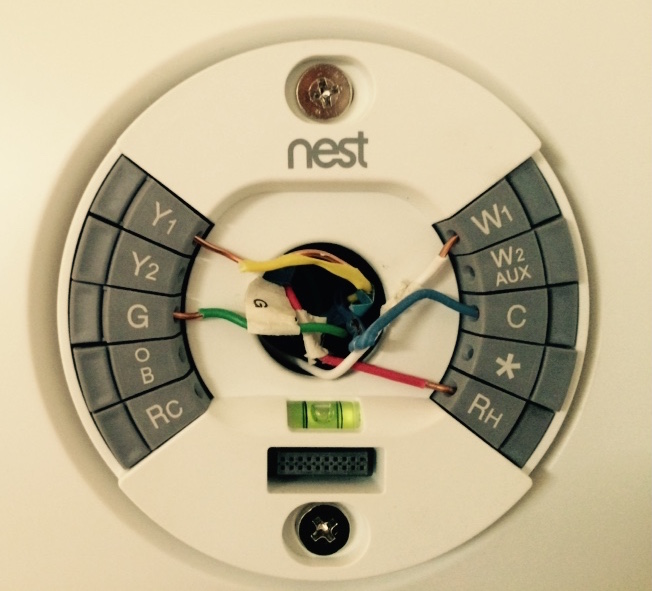
You will notice I already had an extra blue wire in the wall, but it wasn’t in use, so I connected it at both ends.

Now look at the Voc and Vin and Lin values..

nest-power-fixed
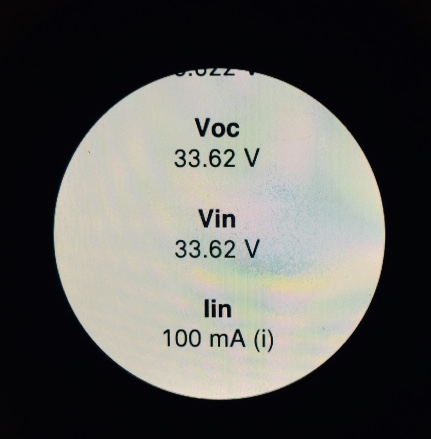
The Voc and Vin are very close, so the AC sine-wave is stable and Lin is 100mA.. This is how it should be and now the furnace works perfectly.

So hopefully if you run into this, now you know how to resolve it. Unfortunately, if you don’t have a spare wire you are going to have to run a new wire through the wall, which will be somewhat, or very, difficult depending on your home.

Being very new, my Nest is a Gen 2 device, and some of the discussions indicated that the Gen 1 devices did not originally have this problem, and then following a software upgrade sometime in the recent past the problem started occurring.  The fix was the same.

After this experience I sent some feedback to Nest about this.

  • It seems common enough of a problem that it should be mentioned in the install guide. Common issues and their solutions should be readily available to self-install homeowners.
  • It also seems like the Nest software could very easily detect this issue. It already monitors the Voc, Vin, and Lin values obviously, and it knows how often the furnace is cycling. It would take very little code to detect the combination of factors and display an alert on the screen and an iPhone notification that there is a power issue, with a knowledge-base article # referenced to read about it. The Nest doesn’t do this so unless you are observant or it’s really cold outside it could linger for days or weeks without you realizing it. And you will find out when it’s really cold, the furnace won’t heat, and you won’t know why.

Otherwise, I think the Nest is pretty slick and I’ll be monitoring to see how it affects my energy bill, if at all.


Footnote: You can type a ˚ on Mac OS X with Option-K or a ° with Option-Shift-8 

Building Blocks – Part VI: But my #PrivateCloud is too small (or too big) for building blocks!

Posted on by

Does your Building Block need a Fabric? <- Part 6

Okay, so this is all well and good, but you have been reading these posts and thinking that your environment is nowhere near the size of my example so Building Blocks are not for you. The fact is you can make individual Building Blocks quite a bit smaller or larger than the example I used in these posts and I’ll use a couple more quick examples to illustrate.

Small Environment: In this example, we’ll break down a 150 VM environment into three Building Blocks to provide the availability benefit of multiple isolated blocks. Additional Building Blocks can be deployed as the environment grows.

150 Total VMs deployed over 12 months
(2 vCPUs/32GB Disk/1GB RAM/25 IOPS per VM)

    • 300 vCPUs
    • 150GB RAM
    • 4800 GB Disk Space
    • 3750 Host IOPS

Assuming 3 Building Blocks, each Building Block would look something like this:

    • 50 VMs per Building Block
    • 2 x Dual CPU – 6 Core Servers (Maintains the 4:1 vCPU to Physical thread ratio)
    • 24-32GB RAM per server
    • 19 x 300GB 10K disks in RAID10 (including spares) — any VNXe or VNX model will be fine for this
      • >1600GB Usable disk space (this disk config provides more disk space and performance than required)
      • >1250 Host IOPS

Very Large Environment: In this example, we’ll scale up to 45,000 VMs using sixteen Building Blocks to provide the availability benefit of multiple isolated blocks. Additional Building Blocks can be deployed as the environment grows.

45000 Total VMs deployed over 48 months
(2 vCPUs/32GB Disk/4GB RAM/50 IOPS per VM)

    • 90000 vCPUs
    • 180,000 GB RAM
    • 1,440,000 GB Disk Space
    • 2,250,000 Host IOPS

Assuming 4 Building blocks per year, each Building Block would look something like this:

    • 2812 VMs per Building Block
    • 18 x Quad CPU – 10 Core Servera plus Hyperthreading (Maintains the 4:1 vCPU to Physical thread ratio)
    • 640GB Ram per server
    • 1216 x 300GB 15K disks in RAID10 (including spares) — one EMC Symmetrix VMAX for each Building Block
      • >90000GB Usable disk space (the 300GB disks are the smallest available but still too big and will provide quite a bit more space than the 90TB required. This would be a good candidate for EMC FASTVP sub-LUN tiering along with a few SSD disks, which would likely reduce the overall cost)
      • >140,000 Host IOPS

Hopefully this series of posts have shown that the Building Block approach is very flexible and can be adapted to fit a variety of different environments. Customers with environments ranging from very small to very large can tune individual Building Block designs for their needs to gain the advantages of isolated, repeatable deployments, and better long term use of capital.

Finally, if you find the benefits of the Building Block approach appealing, but would rather not deal with the integration of each Building Block, talk with a VCE representative about VBlock which provides all of the benefits I’ve discussed but in a pre-integrated, plug-and-play product with a single support organization supporting the entire solution.

Does your Building Block need a Fabric? <- Part 6

Building Blocks – Part V: Does your #PrivateCloud building block need a fabric?

Posted on by

Sizing your Building Block <- Part 5 -> I’m too small for Building Blocks

You may have noticed in the last installment that I did not include any FibreChannel switches in the example BOM. There are essentially three ways to deal with the SAN connectivity in a Building Block and there are advantages as well as disadvantages to each. (Note: this applies to iSCSI as well)

1.) Use switches that already exist in your datacenter: You can attach each storage array and each server back to a common fabric that you already have (or that you build as part of the project) and zone each of the Building Block’s servers to their respective storage array.

  • Advantages:
    • Leverage any existing fabric equipment to reduce costs and centralize management
    • Allow for additional servers to be added to each Building Block in the future
    • Allow for presenting storage from one Building Block to servers in a different Building Block (useful for migrations)
  • Disadvantages:
    • Increases complexity – Requires you to configure zoning within each Building Block during deployment
    • Increases chances for human error that could cause an outage – Accidentally deleting entire Zonesets or VSANs is not as uncommon as you might think
    • Reduces the availability isolation between Building Blocks – The fabric itself becomes a point-of-failure common to all Building Blocks.

2.) Deploy a dedicated fabric within each Building Block: Since each Building Block has a known quantity of storage and server ports, you can easily add a dual-switch/fabric into the design. In our example of 9 hosts you’d need a total of 18 ports for hosts and maybe 8 ports for the storage array for a combined total of 26 switch ports. Two 16-port switches can easily accommodate that requirement.

  • Advantages:
    • Depending on the switches used, it could allow for additional servers in each Building Block in the future
    • Allow for presenting storage from one Building Block to servers in a different building block (useful for migrations) by connecting ISLs between Building Blocks
    • Maintains the Building Block isolation by not sharing the fabric switches across Building Blocks.
  • Disadvantages:
    • Increases complexity – Requires you to configure zoning within each Building Block during deployment
    • Increases chances for human error that could cause an outage – Again, accidentally deleting entire Zonesets or VSANs is not as uncommon as you might think

3.) Dispense with the fabric entirely: Since Building Blocks are relatively small, resulting in fewer total initiator/target pairs, it’s possible in some cases to directly attach all of the hosts to the storage array. In our example, the nine hosts need eighteen ports and the VNX5700 supports up to twenty four FC ports. This means you can directly attach all of the hosts to the array and still have six remaining ports on the array for replication, etc. Different arrays from EMC as well as other vendors will have various limits on the number of FC ports supported. Also, not all vendors support direct attached hosts so you’ll need to check that with your storage vendor of choice to be sure.

  • Advantages:
    • Maintains the Building Block isolation by not sharing the fabric switches across Building Blocks.
    • Simplifies deployment by eliminating the need to do any zoning at all and effectively eliminates any port queue limits (HBA elevator depth settings)
    • Simplifies troubleshooting by eliminating the fabric (buffer to buffer credits, bandwidth, port errors, etc) from the IO path.
  • Disadvantages:
    • Limits the number of hosts per Building Block by the maximum number of ports supported by the storage array.
    • More difficult to non-disruptively migrate VMs between Building Blocks since storage cannot be shared across. (If all Building Blocks are in the same Virtual Data Center in VMWare vSphere, you can still live-migrate VMs via the IP network between Building Blocks using Storage vMotion)

If you decide that the host count limit is okay, and either non-disruptive migration between Building Blocks is unnecessary or Storage vMotion will work for you, then eliminating the fabric can reduce cost and complexity, while improving overall availability and time to deploy. If you need the flexibility of a fabric, I personally like using dedicated switches in each building block. Cisco and Brocade both offer 1U switches with up to 48 ports per switch that will work quite well. Always deploy two switches (as two fabrics) in each Building Block for redundancy.

Okay, so you’ve managed to calculate the size of your environment, how much time it will take you to virtualize it, the number of Building Blocks you need, and the specifications for each Building Block, including whether you need a fabric. Now you can submit your budget, get your final quotes, and place orders. Once the equipment arrives it’s time to implement the solution.

When your first Building Block arrives, it would be a valuable use of time to learn how to script the configuration for each component in the Building Block. An EMC VNX array can be completely configured using Naviseccli or PowerShell, from the Storage Pool and LUN provisioning to initiator registration and Host/LUN masking. VMWare vSphere can similarly be configured using scripts or PowerShell. If you take the time to develop and test your scripts against your first Building Block, then you can use those scripts to quickly stand up each additional Building Block you deploy. Since future Building Blocks will be nearly identical, if not entirely identical, the scripts can speed your deployment time immensely.

EMC Navisphere/Unisphere CLI (for VNX) is documented fully in the VNX Command Line Interface (CLI) Reference for Block 1.0 A02. This document is available on EMC PowerLink at the following location:

Home > Support > Technical Documentation and Advisories > Software ~ J-O ~ Documentation > Navisphere Management Suite > Maintenance/Administration

Be sure to leverage any storage vendor plug-ins available to you for your chosen hypervisor (VMWare, Hyper-V, etc) to improve visibility up and down the layers and reduce the number of management tools you need to use on a daily basis.

For example, EMC Unisphere Manager, the array management UI running on the VNX storage array, includes built-in integration with VMWare and other host operating systems. Unisphere Manager displays the VMFS datastores, RDMs, and VMs that are running on each LUN and a storage administrator can quickly search for VM names to help with management and/or troubleshooting tasks.

EMC also provides free downloadable plug-ins for VMWare vSphere and Hyper-V so server administrators can see what storage arrays and LUNs are behind their VMs and datastores. The plug-ins also allow administrators to provision new LUNs from the storage array through the plug-ins without needing access to the array management tools.

Depending on which storage vendor you choose, if you build a fabric-less Building Block, you may be able to do all of your server and storage administration from vCenter if you leverage the free plug-ins.

Sizing your Building Block <- Part 5 -> I’m too small for Building Blocks

Building Blocks – Part IV: Sizing Your #PrivateCloud Building Blocks

Posted on by

How many Building Blocks? <- Part 4 -> Does your Building Block need a Fabric?

Now that we know we’ll be deploying about 562 VM’s per Building Block we can use the other metrics to determine the requirements for a single block.

  • Since 562 VMs is about 12.5% of the 4500 total VMs, we then calculate 12.5% of the other metrics determined in the last post.
    • 12.5% of 9000 vCPUs = 1125 vCPUs
    • 12.5% of 4500GB RAM = 562GB RAM
    • 12.5% of 225,000 IOPS = 28125 Host IOPS
    • 12.5% of 562TB = 70TB Usable Disk capacity

First we’ll size the compute layer of the Building Block

  • At 4:1 vCPUs per Physical CPU thread you’d want somewhere around 281 hardware threads per Building Block. Using 4-socket, 8-core servers (32 cores per server) you’d need about 9 physical servers per building block. The number of vCPUs per physical CPU thread affects the % CPU Ready time in VMWare vSphere/ESX environments.
  • For 562GB of total RAM per Building Block, each server needs about 64GB of RAM
  • Per standard best practices, a highly available server needs two HBAs, more than two can be advantageous with high IOPS loads.

Next, we’ll calculate the storage layer of the Building Block

  • Assuming no cache hits, the backend disk load for 28,125 Host IOPS @ 50:50 read/write looks like the following:
    • RAID10 : 28125/2 + 28125/2*2 = 42187 Disk IOPS
    • RAID5 : 28125/2 + 28125/2*4 = 70312 Disk IOPS
    • RAID6 : 28125/2 + 28125/2*6 = 98437 Disk IOPS
  • If you calculate the number of disks required to meet the 70TB Usable in each RAID level, and the # of disks needed for both 10K RPM and 15K RPM disks to meet the IOPS for each RAID level, you’ll eventually find that for this specific example, using EMC Best Practices, 600GB 10K RPM SAS disks in RAID10 provides the least cost option (317 disks including hot spares). Since 10K RPM disks are also available in 2.5” sizes for some storage systems, this also provides the most compact solution in many cases (29 Rack Units for an EMC VNX storage array that has this configuration). In reality this is a very conservative configuration that ignores the benefits of storage array caching technologies and any other optimizations available, it’s essentially a worst case scenario and it would be beneficial to work with your storage vendor’s performance group to perform a more intelligent modeling of your workload.
  • Finally, you’ll need to select a storage array model that meets the requirements. Within EMC’s portfolio, 317 disks necessitate an EMC VNX5700 which will also have more than enough CPU horsepower to handle the 28125 host IOPS requirement.

At this point you’ve determined the basic requirements for a single Building Block which you can use as a starting point to work with your vendors for further tuning and pricing. Your vendors may also propose various optimizations that can help save you money and/or improve performance such as block-level tiering or extended SSD/Flash based caching.

Example bill-of-materials (BOM):

  • 9 x Quad-CPU/8-Core servers w/64GB RAM each
  • 2 x Single port FibreChannel HBAs
  • 1 x EMC VNX5700 Storage Array with 317 x 300GB 2.5” 10K SAS disks

Wait, where’s the fabric?

How many Building Blocks? <- Part 4 -> Does your Building Block need a Fabric?

Building Blocks – Part III: How Many Building Blocks does your #PrivateCloud need?

Posted on by

The Building Block Approach <- Part 3 -> Sizing your Building Block

The key to sizing Building Blocks is to calculate the ratio between the compute and storage metrics. First you need to take a look at the total performance and disk space requirements for the whole environment, similar to the below example:

  • Total # of Virtual Machines you expect to be hosting (example: 4500 VMs)
  • Total Virtual CPUs assigned to all Guest VMs (average of 2 vCPUs per VM = 9000 vCPUs)
  • Total Memory required across all Guest VMs (average of 1GB per VM = 4.5TB)
  • Total Host IOPS needed at the array for all Guest VMs (average of 50 IOPS per VM = 225,000 Host IOPS)
    • You will need to have a read/write ratio with this as well (we will use 50:50 for these examples)
  • Total Disk Storage required for all Guest VMs. (average of 125GB per VM = 562TB)

Once you have the above data, you need to decide how many Building Blocks you want to have once the entire environment is built out. There are several things to consider in determining this number:

  • How often you want to be deploying additional Building Blocks (more on this below)
  • Your annual budget (I’m ignoring budget for this example, but your budget may limit the size of your deployment each year)
  • How many VMs you think you can deploy in a year (we’ll use 2250 per year for a two year deployment)

Some of these are pretty subjective so your actual results will vary quite a bit, but based what I’ve seen I do have some recommendations.

  • In order to take advantage of the availability isolation inherent in the Building Block approach, you’ll want to start with at least two Building Blocks and then add them one or two at a time depending on how you want to spread your server farms across the infrastructure.
  • Depending on the size of each Building Block you may want to keep Building Block deployments down to one every 3-6 months. That gives you ample time to build each block correctly and hopefully leaves time between deployments to monitor and adjust the Building Blocks.

That said I’d lean toward 4 to 6 Building Blocks per year. Of course this is just my opinion and your mileage may vary. For our example of 4500 VMs over 2 years @ 4 Building Blocks per year. we’ll end up with 8 Building Blocks with about 562 VMs each.

The Building Block Approach <- Part 3 -> Sizing your Building Block

Building Blocks – Part II: The Building Block Approach to the #PrivateCloud

Posted on by

Build your own Private Cloud <- Part 2 -> How many Building Blocks

Since server virtualization abstracts the physical hardware from the operating systems and applications, essential for Cloud Infrastructures (also known as Infrastructure-as-a-Service), it’s ideally suited for breaking down the physical infrastructure into Building Blocks. Put simply, Building Blocks are repeatable, pre-designed mixes of storage, CPU, and memory.

There are several advantages to the Building Block approach that I’ll point out here:

  1. Rather than dropping a huge amount of capital up front on the entire infrastructure you need over the long haul, some of which will not be used at first, you can start with a smaller capital outlay today, then make multiple similarly small capital purchases only as needed. Further, when the hardware in a single Building Block reaches the end of its life (for any number of reasons), only that one Building Block will need to be refreshed at that time rather than a wholesale replacement of the entire environment.
  2. In an environment where virtualization is a new endeavor, sizing the compute, memory, and storage required is really an educated guess. As each Building Block is consumed, the real-world performance can be analyzed and adjusted for future Building Blocks to more closely match your specific workload.
  3. Building Blocks are inherently isolated which creates natural performance and availability boundaries. This can be leveraged for web and application server farms by spreading nodes of each farm across multiple Building Blocks. In the event of a catastrophic failure of one Building Block, due to major software bug affecting the cluster or the failure of an entire storage array for some reason, nodes of the server farm not hosted on the failed Building Block will be unaffected.
  4. The list price for storage arrays and servers goes down over time. If your growth is similar to many of my customers, where full build out of the physical infrastructure will not be required until 2-3 years after the start of the project, the acquisition cost of each individual Building Block will decrease over time, saving you money overall.
  5. In many cases, and due to a variety of factors, the cost to upgrade a storage array is higher than the cost to purchase the capacity with a new array. Upgrades also add complexity, complicate asset depreciation, and warranty renewals. The Building Block approach eliminates the majority of upgrades and the associated complexity.

Each Building Block can be maintained in its original build state or upgraded independent of the other building blocks so, for example, you don’t have to worry about upgrading every server in your datacenter with new HBA drivers if you decide to upgrade the storage array firmware on one array. You would only need to upgrade the servers in that arrays’ Building Block.

You may be thinking that your environment is not large enough to use a Building Block approach, but the more I worked on this project, the more I realized that Building Blocks can be adjusted to fit even very small environments. I’ll go into that a bit more later.

Build your own Private Cloud <- Part 2 -> How many Building Blocks

Building Blocks – Part I: Build your own #PrivateCloud

Posted on by

Part 1 -> The Building Block Approach

As 2011 wraps up and I have a little time at home over the holidays, I’ve been reflecting on some of the customer projects I’ve worked on over the past year. Cloud computing and EMC’s vision for the “Journey to the Private Cloud” have been hot topics this year and of the various projects I’ve worked on this past year, one stands out to me as something that could be used as a blueprint for others who want to deploy their own Private Cloud but may not know how to start.

I have been working with a customer with approximately 10,000 servers that support their business and for all intents had zero virtualization as recent as 2010.  As most customers already know, they thought it would be good to begin virtualizing their environment to drive up asset utilization and flexibility while bringing down costs.  In the past, they’ve experimented with multiple server virtualization solutions (such as VMWare ESX and Microsoft Hyper-V) with limited success and had all but abandoned the idea.  A change in leadership in late 2010 brought a top-down initiative to virtualize wherever possible, but in order to instill confidence in virtualized environments within the various business units, the virtual infrastructure needed to be reliable and performant.

The customer spent the latter half of 2010 looking at their existing physical environment, finding that about 80% of the 10,000 servers were various application, file, and web servers; the remaining 20% being various database servers (mostly MS SQL).  Moving an infrastructure this large into a Private Cloud model would take several years and, further adding to the challenge, the DBA teams were particularly wary about virtualizing their database servers.  That said, the newly formed Virtualization and Cloud team set a goal of virtualizing the approximately 8,000 non-database servers over 36 months, starting out with dev/test and gradually adding production and tier-1 applications until only the database servers remained on physical infrastructure.  They believe that if they prove success with virtualization during this first 3 years, the DBAs will be more willing to begin virtualizing their systems, plus there should be more knowledge and tools in the public domain for managing virtual database instances by then.

To accomplish all of their goals, the customer leveraged some experience that individual team members had gained from prior environments to come up with a Building Block based deployment.  I worked with them to finalize the design and sizing for the each Building Block and throughout the year have helped analyze the performance of the deployed infrastructure to help determine how the Building Blocks can be optimized further.  Through the next several posts, I will explain the Building Block approach, detailing the benefits, some of the considerations, and some thoughts around sizing.  I hope that this information will be useful to others.  The content is mostly vendor agnostic except for some example data that uses EMC specific storage best practices.

Part 1 -> The Building Block Approach

Defining RTO and RPO for your data…

Posted on by

Do you have a clearly defined Recovery Point Objective (RPO) for your data?  What about a clearly defined Recovery Time Objective (RTO)?

One challenge I run in to quite often is that, while most customers assume they need to protect their data in some way, they don’t have clear cut RPO and RTO requirements, nor do they have a realistic budget for deploying backup and/or other data protection solutions.  This makes it difficult to choose the appropriate solution for their specific environment.  Answering the above questions will help you choose a solution that is the most cost effective and technically appropriate for your business.

But how do you answer these questions?

First, let’s discuss WHY you back up… The purpose of a backup is to guarantee your ability to restore data at some point in the future, in response to some event.  The event could be inadvertent deletion, virus infection, corruption, physical device failure, fire, or natural disaster.  So the key to any data protection solution is the ability to restore data if/when you decide it is necessary.  This ability to restore is dependent on a variety of factors, ranging from the reliability of the backup process, to the method used to store the backups, to the media and location of the backup data itself.  What I find interesting is that many customers do not focus on the ability to restore data; they merely focus on the daily pains of just getting it backed up.  Restore is key! If you never intend to restore data, why would you back it up in the first place?

What is the Risk?

USA Today published an article in 2006 titled “Lost Digital Data Cost Businesses Billions” referencing a whole host of surveys and reports showing the frequency and cost to businesses who experience data loss.

Two key statistics in the article stand out.

  • 69% of business people lost data due to accidental deletion, disk or system failure, viruses, fire or another disaster
  • 40% Lost data two or more times in the last year

Flipped around, you have at least a 40% chance of having to restore some or all of your data each year.  Unfortunately, you won’t know ahead of time what portion of data will be lost.  What if you can’t successfully restore that data?

This is why one of my coworkers refuses to talk to customers about “Backup Solutions”, instead calling them “Restore Solutions”, a term I have adopted as well.  The key to evaluating Restore Solutions is to match your RPO and RTO requirements against the solution’s backup speed/frequency and restore speed respectively.

Recovery Point Objective (RPO)

Since RPO represents the amount of data that will be lost in the event a restore is required, the RPO can be improved by running a backup job more often.  The primary limiting factor is the amount of time a backup job takes to complete.  If the job takes 4 hours then you could, at best, achieve a 4-hour RPO if you ran backup jobs all day.  If you can double the throughput of a backup, then you could get the RPO down to 2 hours.  In reality, CPU, Network, and Disk performance of the production system can (and usually is) affected by backup jobs so it may not be desirable to run backups 24 hours a day.  Some solutions can protect data continuously without running a scheduled job at all.

Recovery Time Objective (RTO)

Since RTO represents the amount of time it takes to restore the application once a recovery operation begins, reducing the RTO can be achieved by shortening the time to begin the restore process, and speeding up the restore process itself.  Starting the restore process earlier requires the backup data to be located closer to the production location.  A tape located in the tape library, versus in a vault, versus at a remote location, for example affects this time.  Disk is technically closer than tape since there is no requirement to mount the tape and fast forward it to find the data.  The speed of the process itself is dependent on the backup/restore technology, network bandwidth, type of media the backup was stored on, and other factors.  Improving the performance of a restore job can be done one of two ways – increase network bandwidth or decrease the amount of data that must be moved across the network for the restore.

This simple graph shows the relationship of RTO and RPO to the cost of the solution as well as the potential loss.The values here are all relative since every environment has a unique profit situation and the myriad backup/restore options on the market cover every possible budget.

Improving RTO and/or RPO generally increases the cost of a solution.  This is why you need to define the minimum RPO and RTO requirements for your data up front, and why you need to know the value of your data before you can do that.  So how do you determine the value?

Start by answering two questions…

How much is the data itself worth?  

If your business buys or creates copyrighted content and sells that content, then the content itself has value.  Understanding the value of that data to your business will help you define how much you are willing to spent to ensure that data is protected in the event of corruption, deletion, fire, etc.  This can also help determine what Recovery Point Objective you need for this data, ie: how much of the data can you lose in the event of a failure.

If the total value of your content is $1000 and you generate $1 of new content per day, it might be worth spending 10% of the total value ($100) to protect the data and achieve an RPO of 24 hours.  Remember, this 10% investment is essentially an insurance policy against the 40% chance of data loss mentioned above which could involve some or all of your $1000 worth of content.  Also keep in mind that you will lose up to 24 hours of the most recent data ($1 value) since your RPO is 24 hours.  You could implement a more advanced solution that shortens the RPO to 1 hour or even zero, but if the additional cost of that solution is more than the value of the data it protects, it might not be worth doing.  Legal, Financial, and/or Government regulations can add a cost to data loss through fines which should also be considered.  If the loss of 24 hours of data opens you up to $100 in fines, then it makes sense to spend money to prevent that situation.

How much value does the data create per minute/hour/day?

Whether or not your data itself has value on it’s own, the ability to access it may have value.  For example, If your business sells products or services through a website and a database must be online for sales transactions to occur, then an outage of that database causes loss of revenue.  Understanding this will help you define a Recovery Time Objective, ie: for how long is it acceptable for this database to be down in the event of a failure, and how much should you spend trying to shorten the RTO before you get diminishing returns.

If you have a website that supports company net profits of $1000 a day,  it’s pretty easy to put together an ROI for a backup solution that can restore the website back into operation quickly.  In this example, every hour you save in the restore process prevents $42 of net loss.  Compare the cost of improving restore times against the net loss per hour of outage.  There is a crossover point which will provide a good return on your investment.

Your vendor will be happy when you give them specific RPO and RTO requirements.

Nothing derails a backup/recovery solution discussion quicker than a lack of requirements.  Your vendor of choice will most likely be happy to help you define them but it will help immensely if you have some idea of your own before discussions start.  There are many different data protection solutions on the market and each has it’s own unique characteristics that can provide a range of RPO and RTO’s as well as fit different budgets. Several vendors, including EMC, have multiple solutions of their own — one size definitely does not fit all.  Once you understand the value of your data, you can work with your vendor(s) to come up with a solution that meets your desired RPO and RTO while also keeping a close eye on the financial value of the solution.

Does EMC FASTCache work with Exchange?

Posted on by

Short Answer: Yes!

In my dealings with customers I’ve been requesting performance data from their storage systems whenever I can to see how different applications and environments react to new features. Today I’m going to give you some more real-world data, straight from a customer’s production EMC NS480.

I’ve pulled various stats out of Analyzer for this customer’s Exchange server, which has 3 mail databases totaling about 1TB of mail stored on the NS480 via FibreChannel connect. Since this customer is not extremely large (similar to most of our customers) they are using this NS480 for pretty much everything from VMWare, SQL, and Exchange, to NAS, web/app content, and Business Intelligence systems. There is about 30TB of block data and another 100TB of NAS data. FASTCache is enabled for all LUNs and Pools with just 183GB of usable FASTCache space (4 x 100GB SSDs). So in this environment, with a modest amount of FASTCache and very mixed workload, how does Exchange fare?

Let’s first take a look at the Exchange workload itself for a 24 hour period: (Note: There were no reads from the Exchange log LUNs to speak of so I left that out of this analysis.)

Total Read IOPS for the 3 databases: (the largest peak is a result of database maintenance jobs and the smaller peaks are due to backup jobs) Here it’s tough to see due to the maintenance and backup peaks, but production IO during the work day is about 200-400IOPS. By the way, a source-deduplicating incremental-forever backup technology, such as Avamar, could drastically reduce the IO Load and duration of the nightly backup

Total Write IOPS for the 3 databases: Obviously more changes to the database occurring during the work day.

Total Write IOPS for the 3 Log files: Log data is typically cached easily in the SP cache so FAST Cache isn’t terribly required here but I’m including it to show whether there is any value to using FASTCache with Exchange logs.

Now let’s look at the FASTCache hit ratios for this same set of data: (average of all 3 DBs)

First, the Read Activity: Here you can see that aside from the maintenance and backup jobs, FASTCache is servicing 70-90% of the Read IOPs. Keep in mind that a FASTCache miss could still be a Cache Hit if the data is in SP Cache. What’s interesting about this is that it looks like the nightly maintenance job is pushing the highest load.

And the Write Activity: The beauty of EMC’s FASTCache implementation being a read/write cache, the benefit extends beyond just read IO. Here you see that FASTCache is servicing 60-80% of the writes for these Exchange Databases. That’s a huge load off the backend disks.

And the Log Writes: Since Log writes are usually not a performance problem, I would say that FASTCache is not necessary here, and the average 30% hit ratio shown here is not great. If you wanted to spend the time to tune FASTCache a bit, you might consider disabling FASTCache for Log LUNs to devote the FASTCache capacity to more cache friendly workloads.

All in all you can see that for the database data, FASTCache is servicing a significant portion of the user generated workload, reducing the backend disk load and improving overall performance.

Hopefully this gives you a sense of what FASTCache could do for your Exchange environment, reducing backend disk workload for reads AND writes. I must reiterate, since an SP Cache hit is shown as a FASTCache miss, an 80% FASTCache hit ratio does not mean that 20% of the IOs are hitting disk. To illustrate this, I’ve graphed the sum of SP Cache Hits and FAST Cache Hits for a single database. You can see that in many cases we’re hitting a total of 100% cache hits.

Most interesting is the backup window where SP Cache is really handling a huge amount of the load. This is actually due to the Prefetch algorithms kicking in for the sequential read profile of a backup, something CX/VNX is very good at.

2011 Memorial Day Camping – Trip and Camping Gear reviews…

Posted on by 1 comment

For the past 13 years, I’ve organized a group camping trip on Memorial Day weekend.  For the most recent 5 years or so we’ve also made the camping trip into a celebration and fundraiser for the charity that my wife and I founded (www.ctyl.org).  Every year I look at the available Washington State Parks on the east side of the Cascades for a group site that can accommodate up to 40 people, has a body of water nearby, and generally looks nice.  We go back to sites we like periodically as well.  Prior to 2011, we had camped at the following locations, some of them several times:

  • Alta Lake State Park
  • Lake Wenatchee State Park
  • 25-Mile Creek Campground (on Lake Chelan)
  • Perrygin Lake State Park
  • Lincoln Rock State Park (on Lake Entiat)

This year I decided to try Sun Lakes/Dry Falls State Park near Coulee City and aside from some variable weather that is always a bit of a challenge on Memorial Day Weekend, this location delivered a lot.

Dry Falls

First, the scenery is amazing and the group site, which is on a little hill between the main campground and the RV sites, is situated perfectly to take in the scenery right from your tent or picnic table.  Within walking distance of the campsite, there are miles of trails, a swimming beach, kids play area with climbing toys, a 9-hole golf course (Vic Meyers Golf Course), an 18-hole mini golf course, water balloon battle facility, water skiing, fishing, and paddle boating.  With a short drive (5-30 minutes depending) you can visit Lake Lenore Caves, Dry Falls Visitor Center, Grand Coulee Dam, and several different lakes for more fishing and boating opportunities.  For the 2011 Memorial Day weekend, the weather held to around 65-75 degrees during the day, two short rain periods (30 minutes each) came through, and on Sunday morning from about Midnight till 9am we experience very strong winds (30-40+ MPH) which toppled a tent and a screened shelter, and flattened several other tents.  The rest of the time it was sunny and nice.  At night it was pretty cold so heavy blankets/sleeping bags are a must.  Weather at Sun Lakes is typically very nice during the main part of summer (July/Aug/Sep) with average temps of 85 degrees during the day.

Speaking of winds and tents, I took some pictures of various tents that we had this year and how they were faring during the wind storm.  Most interesting was the two versions of REI Hobitat 6 tents that were next to each other.

Old REI Hobitat 6 in front, new version of Hobitat 6 behind

The older version (closest to camera) could not handle the wind even with all of the guy wires staked out for support.  The newer version held up just fine without any support lines.  Our screened shelter started to fall apart because we hadn’t properly secured it but once we staked down the support wires it stood its ground.  Our new, huge, tent held up great in the wind, except for the ground stakes that were included.  We had to switch to different ground stakes which worked much better.

Coleman WeatherMaster 10 16x8 3-Room Tent (Model # 2000008678)

This Coleman WeatherMaster 10 is a special Costco Only version based on the WeatherMaster 6 I believe.  The 6 has a screened porch while this Costco model had solid nylon to close the screens making the porch into a 3rd room.  It’s 16×10 feet in size and has near vertical walls on all 4 sides.  The hinged door is way more handy than you’d think it would be and it barely moved in the strong winds.  It’s huge inside with room for porta-crib, dog bed, bags and 2 queen air mattresses without trying very hard.  There were no rain leaks and it was easy to set up.  However it’s quite heavy to pack (about 50lbs) and it takes 20 minutes to assemble.  If you think you will see any wind, scrap the included tent stakes and buy the Coleman 9 inch ABS plastic stakes which are about $3 for 6.  You’ll need 22 ground stakes for this tent with the rain fly.  Make sure to bring a hammer or mallet and sink the ground stakes as far down into the ground as possible and at a slight angle (top of stake pointing away from the tent).

Coleman Tent Stakes ABS 9" (Model # 2000003425)

One thing to note… this WeatherMaster 10 tent is not the same one that Coleman lists on their website or that you’d find if you Google’d for it and based on the reviews I’ve read of that tent it’s a good thing.  The normal WM10 has angled walls on the ends that make it hard to stand up near the ends; the Costco version has much more standing room.  Costco sells this tent for $143 right now which is a screamin deal.

Several years ago I picked up a Coleman Tent Light which mounts to the inside wall or ceiling of the tent using a magnet with a metal plate on the outside.  It has been really handy and works with pretty much any tent.

Coleman Tent Light (Model# 2000000032)

Last year, we also replaced our leaking air bed with the queen sized Coleman Quickbed.  There are several versions of this with varying thicknesses and some with built-in speakers for MP3 players, others with attached carrying bags.  Regardless of which one you choose, the primary reason thing you need to look for is the built-in battery powered air pump.  You might think that you can use any pump to blow up your air mattress, and you’d be right, but having one built-in to the mattress provides several benefits.

  1. You don’t need to remember where you put your pump when you want to use the air mattress.
  2. You have a valid excuse for not letting other people borrow your air pump.
  3. In the middle of the night, when the air temperature has dropped and the air mattress pressure has dropped as a result of the denser air, you can reach over your pillow, turn a knob on the mattress, and pump it right back up without leaving your sleeping bag.

This air bed is one of the best things we’ve ever purchased for camping in my opinion.

Coleman Quickbed with MP3 Speakers and Built-In 4D Pump Queen

This year my wife has been experimenting and blogging about make-ahead cooking and she decided to apply it to camping.  So instead of bringing raw ingredients and preparing everything at the campsite, all of our meals were prepared ahead of time in various ways, some cooked and frozen, others chopped and ready for cooking, etc.  This made meal time quicker, easier, and tastier and also made clean up easier.  To cook the food we brought the usual two-burner propane stove (mine is an Edmund Hillary brand I’ve had for many years) and a griddle that fits perfectly on the stove.  For cookware we brought our Magma Nestable Non-Stick Stainless Steel set.  We originally bought this set for our boat and realized its size makes it perfect for these types of camping trips.  The set is definitely not light enough to pack in a backpack, but otherwise it’s awesome.  It cleans up easy and has pretty much every type of stove top pot/pan you need.  You can get this set at many marine supply stores or online at Amazon which has it for just about $200.

Magma Nestable Non-Stick Stainless Steel Cookware (10 piece)

While picking up our tent at Costco, we also noticed the Coleman All-in-One Cooking system and decided to buy it.  It’s a stove that can also be made into a grill or griddle and it comes with a stock pot that acts like a slow cooker.  It’s actually a pretty nice setup and Costco’s price can’t be beat.  We used all the modes and it worked quite well with one exception.  The slow cooker was a tad too hot even when the burner was on low so our chili kept boiling a little when we wanted it to just stay warm.  Other than that, a pretty sweet kit.  The kit includes the Coleman Insta-Start stove plus accessories that are normally optional but the kit’s price is lower.  It appears that it is only available as a complete kit at Costco, Sams Club, and Camping World and Costco’s price was $99.

Coleman All-In-One Cooking System (Model # 2000003609)

Another Costco purchase was the pack of three LED Flashlights.  They are TechLite Lumen Master flashlights with 150 lumens of output and run on 3 AAA batteries.  Online the price seems to be about $30 for the set of 3 but Costco had them for $19.99.  These are the brightest flashlights I’ve used, LED or not, period.  Totally worth the money and they are rugged aluminum and fit in your pocket.

TechLite Lumen Master CREE LED

Well, that wraps up this post.  I hope this is helpful to anyone looking for some camping ideas.