Category Archives: technologies

NetApp and EMC: Real world comparisons

Posted on by

I’ve been tasked recently on a project to increase availability of applications through the use of multiple/disparate storage systems.  This environment has heavily invested in EMC Clariion and Celerra storage systems over the past few years and needed a non-EMC platform from which to build the second half of a redundant storage environment.  For various reasons I won’t go into here, we chose IBM nSeries as that second platform. (Since the IBM system is rebranded NetApp FAS, I will refer to this as a NetApp filer.)  I’ve been working on implementing the new equipment as well as integrating it into the Business Continuity strategy.

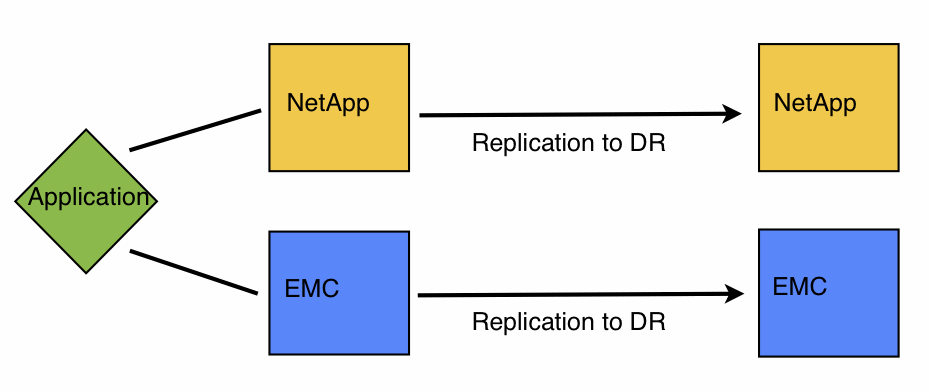
The overall strategy is to continue to use the EMC Clariion/Celerra systems for production and disaster recovery replication and split applications between and across the two storage platforms for local redundancy.  The NetApp will also perform disaster recovery replication for some of the applications.  Here’s a really simple diagram that might help if the description is confusing:

EMC and NetApp Redundancy

EMC and NetApp Redundancy

Now this may sound easy, but it is, in fact, NOT straightforward.  This strategy requires close coordination with application owners and careful planning.  As we move forward on this project, I’ll talk about various idiosyncrasies, caveats, and problems we’ve faced, how we got around them, and I’ll also talk a lot about the differences between the Clariion/Celerra and NetApp platforms’ features and functionality, application support, and manageability.  These comparisons will include using both systems with FiberChannel connections as well as CIFS/NFS NAS, all in conjunction with DR replication and failover.

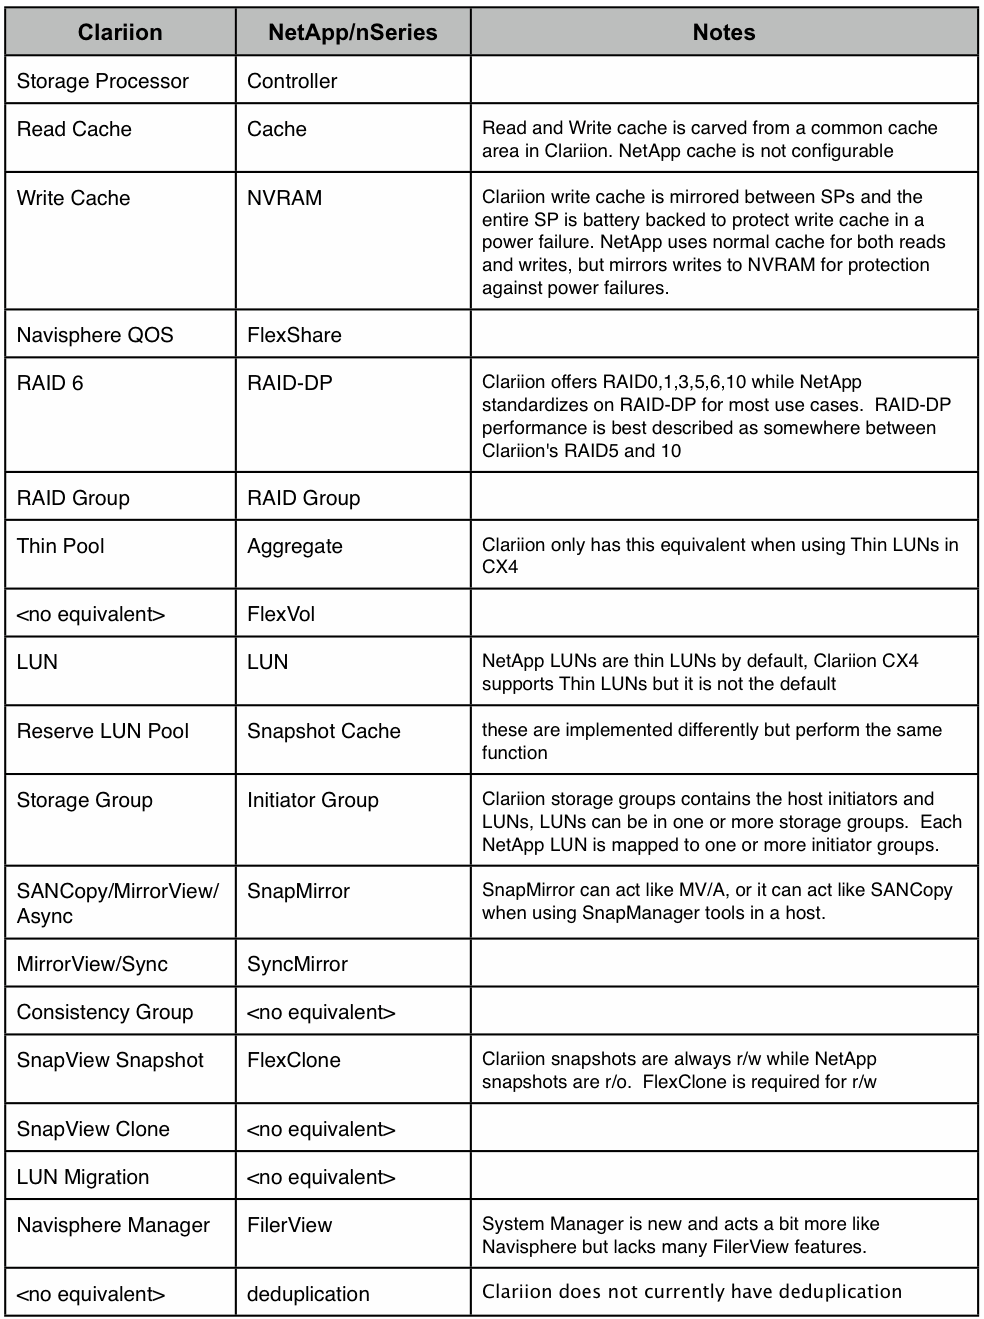
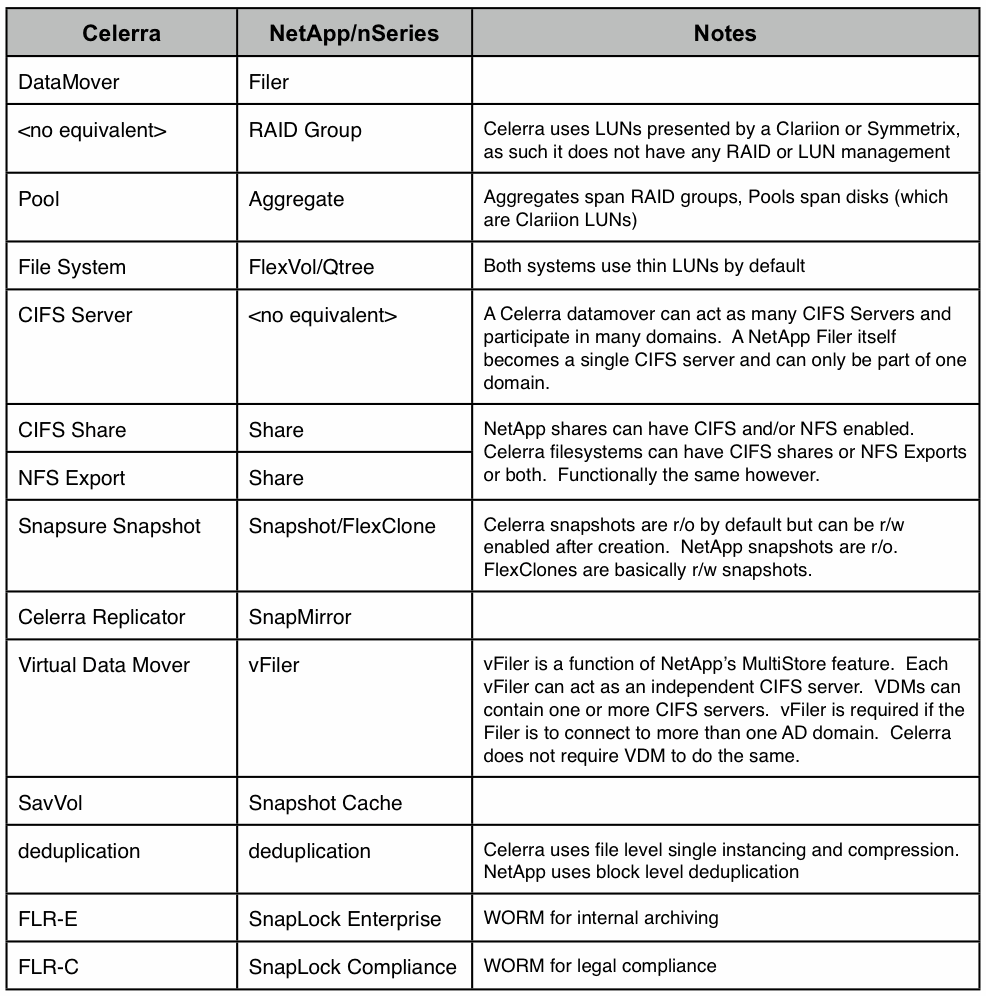
To start off, I figure we should compare some of the terminology between EMC and NetApp systems.  Some terms don’t directly translate, but I matched them up as close as I could and noted where there is no equivalent.   Below are two tables: one for Block Storage, and the other for NAS Storage.  Click on them to see full size versions.

EMC-NetApp Block Storage Terminology table

EMC-NetApp Block Storage Terminology

EMC-NetApp NAS Storage Terminology

EMC-NetApp NAS Storage Terminology

In the next update, I’ll start talking about the deployment itself.  The point of these articles is to discuss the differences, advantages, and disadvantages of each platform so that you can understand how each one might work in your environment.  I do not intend to disparage either platform or vendor.  I will try to be vendor agnostic as much as possible, and I do feel like I have a somewhat unique position of comparing new and recent hardware and firmware from both vendors, in the same production capacities, simultaneously, in the same environment.  I am NOT comparing old ONTap code to new FLARE/DART code or vise-versa, nor am I comparing old Clariion CX hardware to new NetApp/IBM hardware, etc.

Stay tuned!

Clariion CX4 – New Features in Flare 29

EMC released FLARE 29 (04.29.000.5.001) for Clariion CX4 systems a few days ago.  The release of the CX4 hardware platform was a very significant upgrade for the Clariion series – moving to a 64bit operating system, implementing hot-add and hot-swap I/O modules, as well as multi-core CPUs for higher performance and scalability.  FLARE 28 was released to support the CX4 platform and introduced Virtual Provisioning (EMC’s name for thin provisioning) to the Clariion feature list.

According to the release notes FLARE 29 adds a couple of new features and builds on existing ones.  All of them will become available with the standard non-disruptive upgrade Clariion owners are accustomed to.

New Features in FLARE 29:

  • 2-port 10Gbps iSCSI IO modules are now available
  • The ability to hot swap IO modules for faster modules (ie: upgrade from 4gb FC to 8gb FC)
  • Idle SATA drives can now spin down to save power
  • iSCSI ports now support VLAN tagging
  • LUNs and MetaLUNs can now be shrunk if using new versions of Windows (ie: Windows 2008)

Additional Updates:

  • The maximum number of LUNs has been increased for all CX4 models (to 8192 for the CX4-960)
  • MirrorView now supports replicating to and/or from Thin provisioned LUNs
  • SANCopy now supports copying to and/or from Thin provisioned LUNs
  • The maximum number of MirrorView/Async sessions has increased to 256 and up to 64 consistency groups with up to 64 mirrors per group.  Up to 512 MirrorView/Sync sessions are supported on CX4-960 hardware.

The really big news here is with MirrorView.  When Virtual Provisioning was released in FLARE 28 on CX4 you could not use MirrorView with any thin LUNs, whether they were the source or destination.  This limited the use of thin LUNs to those applications and/or customers that don’t need or use array-based replication.  EMC’s RecoverPoint product did support thin LUNs but that is a separate, fairly expensive, solution.  The ability to replicate non-thin (fat) LUNs to thin LUNs could be really useful for maximizing the disk utilization at a DR location where performance isn’t a primary concern.

The added ability to upgrade I/O modules to faster versions while online is also very handy.  It means you can tackle problems like increasing iSCSI bandwidth or upgrading core infrastructure (ie: network and SAN switches) with little or no downtime on the storage system.  VLAN tagging with iSCSI can be useful for sharing a storage system between disparate server environments that need to be separated for security or performance reasons.

As a Clariion and MirrorView user myself, I look forward to taking advantage of the added thin provisioning support with our upcoming CX4-960.

Backup Everything – DR and Offsite copies

Okay, now that I’ve talked about backing up the datacenter with NetBackup and DataDomain, and backing up remote sites with NetBackup and PureDisk, it’s time to discuss how to get all that data offsite to protect against a catastrophic event at the datacenter.

As mentioned before we have a primary datacenter with the majority of our systems including the backup environment, and a secondary “disaster recovery” datacenter to which we replicate tier 1 applications for business continuity purposes.  Since we really wanted to get away from using tapes and instead store the backups on disk in our datacenter we have a second backup environment in the DR datacenter and we replicate the backup data there.

There are several ways to replicate backup data between two sites but most of them have drawbacks..

1.) Duplicate the backup data from disk to tape and ship the tapes to the remote site to be ready for restore.  This is the easiest and probably cheapest way.  But there’s that pesky tape yet again with it’s media handling and shipping.  And restore could take a while since you have to deal with restoring the catalog from tape, then importing the media, etc.

2.) Duplicate the backup data directly from the local disk to the disk in the second location across the WAN.  This is not very feasible with any significant amount of data because every byte of data that is backed up in the datacenter has to be copied across the much slower WAN.  It could take many days to duplicate a single nights’ backup.  You’d also need a special Catalog backup job that wrote to a storage device across the WAN.  The good here is that the backup application knows there is a second copy of the data and knows how to find it.

3.) Replicate the data with the backup storage devices’s native replication.  Whether it’s PureDisk, Avamar, or DataDomain, pretty much every source-based or target-based deduplication solution has replication built in that leverages the deduplication to reduce the amount of data that traverses the WAN.  The advantage here is that you can have a copy of all of your backup data in a second location in a much shorter time than a traditional copy process.  If your deduplication device stores the data with 10:1 compression, then your WAN usage is reduced by 90%.  The savings in practice is actually better than that.  The drawback is that the backup application (hence the catalog) has no knowledge that there is a second copy of the backup data and after recovering the catalog, you would need to import all of the disk-based media which could take a long time.

4.) Leverage NetBackup Lifecycle Policies with Symantec OpenSTorage (OST) and an OST-capable backup storage system like DataDomain or PureDisk(with PDDO).  Basically this has all the advantages of option #2, where it is a catalog-aware duplication, combined with the advantages of WAN bandwidth savings from option #3.  Time to copy the data offsite is much shorter due to deduplication, and time to restore is very fast since the data is already in the catalog and available on the disk.

OpenSTorage (OST) is a network protocol that Symantec developed to interface with disk-based backup storage systems and DataDomain was an early adopter of OST.  OST allows Netbackup to control replication between OST-capable storage systems and keep track of the replicated copies of backups in the Catalog just as if Netbackup had made both copies itself.  OST is also used as the protocol to send the backup data to the storage device as opposed to CIFS/NFS or VTL.  DataDomain appliances support OST as does PureDisk when used in conjunction with the PDDO option discussed earlier.   In NetBackup, replication controlled by OST is called “optimized duplication” and is controlled primarily through Lifecycle Policies.

Traditionally, when creating NetBackup job policies, the administrator will specify a Storage Unit (either a disk storage unit or a tape library or drive) that the job policy will send backups to.  Lifecycle Policies are treated like Storage Units as far as the Job Policy is concerned but the Lifecycle Policy includes a list of storage units, each with it’s own data retention, that the backup data must be stored onto in order for NetBackup to consider the data fully protected.  Typically there is a “Backup” target which is where the actual data coming from the client is stored, followed by one or more “Duplication” targets.  After the backup job completes, NetBackup will copy the backup data from the “backup” location to all of the “duplication” locations.  This works with pretty much any type of storage and you can mix and match tape and disk in the same policy.  Since these are duplication operations, NetBackup will read ALL of the data from the backup location, and write ALL of the data to each duplication location.  This can take a long time even on the local network and trying to offsite a lot of data over the WAN is not very feasible.

With OST, the lifecycle policy operates exactly the same except that it uses “optimized duplication”, instructing the storage device to copy the file rather than performing the copy through a media server.  So in the case of DataDomain, OST issues the command to the DDR, the DDR then copies the file to the second DDR in the remote site and gets all the benefits of deduplication and compression between the two.  The media server doesn’t actually do any work.  Once the duplication is complete, the DDR notifies NetBackup and the catalog is updated with a record of the second copy of the backup.  Lifecycle Policies are fully automated, you can’t even restart a failed duplication, so in the event of a transient failure like a WAN hiccup NetBackup will retry a duplication job forever until it succeeds in order to satisfy the lifecycle policy.

As you can probably surmise, this is REALLY nice for a tape-less backup environment.  Our DD690 offsites over 9TB of data every night DURING the backup window.  When the last backup job completes, the offsite copies are complete within 30 minutes.  And there is absolutely no management of the offsite process or duplication jobs besides configuring the lifecycle policies up front.  The drawback to regular Netbackup lifecycle policies is that all duplications are taken from the initial backup copy which limits what you can do with the copies.

Enter NetBackup 6.5.4…  Despite the small 6.5.3 -> 6.5.4 version number change, the 6.5.4 release had quite a few new features added.  The biggest one was a revamping of the Lifecycle Policy engine to allow for nested duplications.  Now you can create a copy of a backup, then create multiple copies from the copy, then create copies from the other copies.  Why is this useful?

Remember when I discussed using NetBackup with PDDO to backup remote sites?  Well the data backed up from the remote site is all stored in the primary datacenter and we need to get the second copy to the DR datacenter.  Plus, we wanted to have a small cache of recently backed up data sitting on the remote media server for fast restore.  Well, nested lifecycle’s are the key.  The lifecycle writes the initial backup copy onto the media server’s local disk which is configured as a capacity-managed staging area (ie: it stores as much as it can and expires data when it needs more space for new backups).  The lifecycle then creates a duplicate of the backup onto the PureDisk storage unit in the primary datacenter.  Since bandwidth to the remote site is very limited we don’t want to copy it from the remote site twice so the lifecycle has a second duplication nested under the first to copy it to the DR datacenter.  The source of the second copy is the primary datacenter copy, NOT the remote media server copy.

Where else can we use this?  Let’s consider our tape-less datacenter backups..  We backup the clients to the DataDomain in our primary datacenter, then using a lifecycle policy and OST, create a copy on the DataDomain in the DR datacenter.  If we also wanted to have a tape copy for long term archive or vaulting we could create a nested duplication to make a copy to a tape library in the DR datacenter from the disk copy that is also in the DR datacenter.  Without nested lifecycle’s the only workable solution would be to create the tape in the primary datacenter.  Every copy of the backup made via the lifecycle policy whether it is using OST or not is maintained by the catalog and easily used for restore.  Furthermore, using OST as the protocol between Netbackup and DataDomain actually increases throughput to the DataDomain DDR systems by approximately 2X vs VTL/CIFS/NFS.

Now to the caveats.. Optimized duplication via OST is only available when you are using OST as the protocol between the media server and the storage unit.  This means it doesn’t work with VTL even when the DataDomain IS the VTL.  OST only works over an ethernet network which is why we skipped VTL completely and used 10gbps networks for the DDR connections.  We even skipped VTL/Tape for the NAS systems, connected them directly to the 10gbps network and use 3-way NDMP to backup them up over the network, through the media servers, to the DataDomain.  We get the benefit of lifecycle policies, optimized duplication, and I may have mentioned before–no pesky tape even with NDMP/NAS backups.  And the interesting thing is that with the 10gbps connection, the NDMP dumps are faster than direct fiber to tape.

There were other enhancements to NetBackup 6.5.4 centered around OST functionality but the lifecycle policy improvements were huge in my opinion.

To cover the catalog replication, we run Netbackup hot catalog backups to a CIFS share that is hosted by the DataDomain.  The DDR replicates that share using DataDomain native replication to the DDR in the DR datacenter where the same data is available via a similar CIFS share.  Our standby Netbackup master server is already connected to the CIFS share for catalog restore and connected to the DDR via OST.  A single operation restores the catalog from the replicated copy.  In a real disaster we can begin restoring user data within 30 minutes from the DR datacenter.

Backup Everything – Netbackup does WAN

Posted on by

In a previous post I discussed the new backup environment I’ve been deploying, what solutions we picked, and how they apply to the datacenter.  But I also mentioned that we had remote sites with systems we need to back up but I didn’t explain how we addressed them.  Frankly, the previous post was getting long and backing up remote offices is tricky so it deserved it’s own discussion.

Now that we had Symantec NetBackup running in the datacenter, backup up the bulk of our systems to disk by way of DataDomain, we need to look at remote sites.  For this we deployed Symantec NetBackup PureDisk.  Despite the fact that it has NetBackup in the name, PureDisk is an entirely different product with it’s own servers, clients, and management interfaces.  There are some integration points that are not-obvious at first but become important later.  Essentially PureDisk is two solutions in a single product — 1:) a “source-dedupe” backup solution that can be deployed independent of any other solution, and 2:) a “target-dedupe” backup storage appliance specifically integrated with the core NetBackup product via an option called PDDO.

As previously discussed, backing up a remote site across a WAN is best accomplished with a source-dedupe solution like PureDisk or Avamar.  This is exactly what we intended to do.  Most of our remote site clients are some flavor of UNIX or Windows and installing PureDisk clients was easily accomplished.  Backup policies were created in PureDisk and a little over a day later we had the first full backup complete.  All subsequent nightly backups transfer very small amounts of data across the WAN because they are incremental backups AND because the PureDisk client deduplicates the data before sending it to the PureDisk server.  The downside to this is that the PureDisk jobs have to scheduled, managed, and monitored from the PureDisk interface, completely separate from the NetBackup administration console.  Backups are sent to the primary datacenter and stored on the local PureDisk server, then the backed up data is replicated to the PureDisk server in the DR datacenter using PureDisk native replication.  Restores can be run from either of the PureDisk servers but must un-deduplicate the data before sending across the WAN making restores much slower than backups.  This was a known issue and still meets our SLAs for these systems.

Our biggest hurdle with PureDisk was the client OS support.  Since we have a very diverse environment we ran into a couple clients which had operating systems that PureDisk does not support.  Both Netware and x86 versions of Solaris are currently not supported, both of which were running in our remote sites.

We had a few options:

1.) Use the standard NetBackup client at the remote site and push all of the data across the WAN

2.) Deploy a NetBackup media server in the remote site with a tape library and send the tapes offsite

3.) Deploy a NetBackup media server in the remote site with a small DataDomain appliance and replicate

4.) Deploy a NetBackup media server and ALSO use PureDisk via the PDDO option (PureDisk Deduplication Option)

Option 1 is not feasible for any serious amount of data, Option 2 requires a costly tape library and some level of media handling every day, and Option 3 just plain costs too much money for a small remote site.

Option 4, using PDDO, leverages PureDisk’s “target-dedupe” persona and ends up being a very elegant solution with several benefits.

PDDO is a plug-in that installs on a Netbackup media server.  The PDDO plug-in deduplicates data that is being backed up by that media server and sends it across the network to a PureDisk server for storage.  The beauty of this option is that we were able to put a Netbackup media server in our remote site without any tape or other storage.  The data is copied from the client to the media server over the LAN, de-duplicated by PDDO, then sent over the WAN to the datacenter’s PureDisk server.  We get the bandwidth and storage efficiencies of PureDisk while using standard NetBackup clients.  A byproduct of this is that you get these PureDisk benefits without having to manage the backups in PureDisk’s separate management console.  To reduce the effects of the WAN on the performance of the backup jobs themselves, and to make the majority of restores faster, we put some internal disk on the media server that the backup jobs write to first.  After the backup job completes to the local disk, NetBackup duplicates the backup data to the PureDisk storage server, then duplicates another copy to the DR datacenter.  This is all handled by NetBackup lifecycle policies which became about 1000X more powerful with the 6.5.4 release.  I’ll discuss the power of lifecycle policies, specifically with the 6.5.4 release, when I talk about OST later.

So the result of using PureDisk/PDDO/NetBackup together is a seamless solution, completely managed from within NetBackup, with all the client OS support the core NetBackup product has, the WAN efficiencies of source-dedupe, the storage efficiencies of target-dedupe, and the restore performance of local storage, but with very little storage in the remote site.

Remote Site Backup…  Done!!

For the near future, I’m considering putting NetBackup media servers with PDDO on VMWare in all of the remote sites so I can manage all of the backups in NetBackup without buying any new hardware at all.  This is not technically supported by Symantec but there is no tape/scsi involved so it should work fine.  Did I mention we wanted to avoid tape as much as possible?

Incidentally, despite my love for Avamar, I don’t believe they have anything like PDDO available in the Networker/Avamar integration and Avamar’s client OS support, while better than PureDisk’s, is still not quite as good as Netbackup and Networker.

Okay, so how does OST play into NetBackup, PureDisk, PDDO, and DataDomain?  What do the lifecycle policies have to do with it? And what is so damned special about lifecycle policies in NetBackup 6.5.4?  All that is next…

Backup Everything – The datacenter done fast!

Posted on by

I support a very diverse environment with a mix of Windows, Netware, Linux, Solaris, and Mac clients running on standard servers as well as VMWare ESX, plus two different brands of NAS, a few iSeries systems, and an Apple XSAN thrown in for good measure.  We have hundreds of applications running on these systems including SQL, Oracle, MySQL, Sharepoint, Documentum, and Agile.  These applications are mostly contained in our primary datacenter but we also have a few remote datacenters for specific applications and for disaster recovery as well as a couple remote business offices.

Recently I’ve been working on a project to replace our existing backup application with a new one.  We were experiencing extremely long backup windows, low throughput per client, and high backup failure rates with our existing solution and it was time to make a change of some kind.  The goal was to protect all of our systems regardless of their location with both an onsite backup in our primary datacenter and an offsite copy for disaster recovery purposes.  Additionally we wanted to use little or no tape.  After research, lots of vendor meetings, a consulting engagement, and lengthy debate we chose Symantec NetBackup with Symantec NetBackup PureDisk and DataDomain.  This combination was chosen for several reasons which will become clearer below.

For those of you who are not familiar with these products here’s a brief description..

Symantec Netbackup is a traditional backup solution that is designed to move data from many clients, as fast as possible, to disk or tape.  It is similar to EMC Networker, Symantec BackupExec, and any number of other backup products.  NetBackup supports a wide variety of clients, NAS devices, applications (SQL, Exchange, etc), as well as tape libraries and disk storage for the backed up data.  Since it simply copies all of the data that resides on the client directly to the backup server it is not particularly tuned for backing up remote offices across the WAN but it can easily flood a local LAN during a backup.

Symantec NetBackup PureDisk is currently a separate solution from the base NetBackup product; it is designed specifically for backing up data over the WAN.  Puredisk is a “source-dedupe” solution and is very similar in function to EMC’s Avamar product with which I have a long standing love affair. PureDisk performs an incremental-forever style of backup where only the data that changed since the last backup is copied to the backup server.  It then uses deduplication technology to reduce the resulting backup dataset down to an even smaller size before it gets copied across the network.  The data is collected and stored (in it’s deduplicated form) on the backup server.  With this design PureDisk saves network bandwidth as well as disk space on the backup server making it ideal for backups across the WAN, VPN, etc.  Symantec’s goal is to merge PureDisk into NetBackup as a single solution at some point probably next year.  PureDisk backup servers can replicate backed up data to other PureDisk backup servers in de-duplicated form for redundancy across sites. The downside to PureDisk is that raw throughput on a PureDisk backup server is not high enough for datacenter use and client support is more limited than the standard NetBackup product.

DataDomain (now part of EMC) has been making it’s DDR products for a while now and has been very successful (prompting the recent bidding war between NetApp and EMC to purchase the company).  DataDomain appliances are “target-dedupe” devices that are designed to replace tape libraries in traditional backup environments, like Netbackup.  The DDR appliance presents itself as a VTL (virtual tape library) via SAN, a CIFS(Windows) file server, and/or a NFS(UNIX) file server making it compatible with pretty much any type of backup system.  DataDomain also supports Symantec’s OpenSTorage (OST) API which is available in Netbackup 6.5.  The DDR system receives all of the data that Netbackup copies from backup clients, deduplicates the data in real-time, then stores it on it’s own internal disk.  Because the DDR is purpose built and has fast processors it can process data at relatively high throughput rates.  For example, a single DD690 model is rated at 2.7TB/hour (about 6gbps) when using OST.  The deduplication in a DDR provides disk-space savings but does not reduce the amount of data copied from backup clients.  DDRs can also replicate data (in deduplicated form) to other DDRs across the LAN or WAN, great for offsite backups.

For an explanation of de-duplication, check out my prior post on the topic..

Two of the challenges we faced when designing the final solution had to do with the cost per TB of DataDomain disk and the slightly limited client OS support of PureDisk.  But we had a clean slate to work from–there was no interest in utilizing any of the existing backup infrastructure aside from the two IBM tape libraries we had.  We were not required to use the libraries but we wouldn’t be buying new ones if we planned on using tape as part of the new solution.

For the primary datacenter we deployed NetBackup Master and Media servers, a DataDomain DD690, and connected them to each other with Cisco 4900M 10gbps switches.  We deployed a warm-standby master server plus a media server and another DD690 in our DR datacenter but did not use 10gbs there due to the additonal cost.

With this set up we covered all of the clients in our primary datacenter.  Systems that have large amounts of data (like Microsoft Exchange, SAS Financials, etc) were connected directly to the 4900M switches (via 1gbps connections).  Aggregate throughput of the backups during a typical night averages 400-500MB/sec with all of the data going to the DataDomain.  The Exchange server’s flood their network links pushing over 100MB/sec per server when backing up the email databases.  We currently back up 9TB of data per night with 3 media servers and a single DDR in about 5 hours.  Our primary bottlenecks are with the VCB Proxy server (we need more of them) and the aging datacenter core network having an aggregate throughput of a barely more than 1gbps.

But what about those remote sites?  What does OST really add?  How do you tackle the NAS backups without resorting to tape?  All that and more is coming up soon…

Capacity vs. Performance: De-duplication

Posted on by

This is the 3rd part of a multi-part discussion on capacity vs performance in SAN environments.  My previous post discussed the use of thin provisioning to increase storage utilization.  Today we are going to focus on a newer technology called Data De-Duplication.

Data De-Duplication can be likened to an advanced form of compression.  It is a way to store large amounts of data with the least amount of physical disk possible.

De-duplication technology was originally targeted at lowering the cost of disk-based backup.  DataDomain (recently acquired by EMC Corp) was a pioneer in this space.  Each vendor has their own implementation of de-duplication technology but they are generally similar in that they take raw data, look for similarities in relatively small chunks of that data and remove the duplicates.  The diagram below is the simplest one I could find on the web.  You can see that where there were multiple C, D, B, etc blocks in the original data, the final “de-duplicated” data has only one of each.  The system then stores metadata (essentially pointers) to track what the original data looked like for later reconstruction.

Image from eWeek Article

The first and most widely used implementations of de-dupe technology were in the backup space where much of the same data is being backed up during each backup cycle and many days of history (retention) must be maintained.  Compression ratios using de-duplication alone can easily exceed 10:1 in backup systems.  The neat thing here is that when the de-duplication technology works at the block-level (rather than file-level) duplicate data is found across completely disparate data-sets.  There is commonality between Exchange email, Microsoft Word, and SQL data for example.  In a 24 hour period, backing up 5.7TB of data to disk, the de-dupe ratio in my own backup environment is 19.2X plus an additional 1.7X of standard compression on the post de-dupe’d data, consuming only 173.9GB of physical disk space.  The entire set of backed up data, totaling 106TB currently stored on disk, consumes only 7.5TB of physical disk.  The benefits are pretty obvious as you can see how we can store large amounts of data in much less physical disk space.

There are numerous de-duplication systems available for backup applications — DataDomain, Quantum DXi, EMC DL3D, NetApp VTL, IBM Diligent, and several others.  Most of these are “target-based” de-duplication systems because they do all the work at the storage layer with the primary benefit being better use of disk space.  They also integrate easily into most traditional backup environments.  There are also “source-based” de-duplication systems — EMC Avamar and Symantec PureDisk are two primary examples.  These systems actually replace your existing backup application entirely and perform their work on the client machine that is being backed up.  They save disk space just like the other systems but also reduce bandwidth usage during the backup which is extremely useful when trying to get backups of data across a slow network connection like a WAN.

So now you know why de-duplication is good, and how it helps in a backup environment.. But what about using it for primary storage like NAS/SAN environments?  Well it turns out several vendors are playing in that space as well.  NetApp was the first major vendor to add de-duplication to primary storage with their A-SIS (Advanced Single Instance Storage) product.  EMC followed with their own implementation of de-duplication on Celerra NAS.  They are entirely different in their implementation but attempt to address the same problem of ballooning storage requirements.

EMC Celerra de-dupe performs file-level single-instancing to eliminate duplicate files in a filesystem, and then uses a proprietary compression engine to reduce the size of the files themselves.  Celerra does not deal with portions of files.  In practice, this feature can significantly reduce the storage requirements for a NAS volume.  In a test I performed recently for storing large amounts of Syslog data, Celerra de-dupe easily saved 90% of the disk space consumed by the logs and it hadn’t actually touched all of the files yet.

NetApp’s A-SIS works at a 4KB block size and compares all data within a filesystem regardless of the data type.  Besides NAS shares, A-SIS also works on block volumes (ie: FiberChannel and iSCSI LUNs) where EMC’s implementation does not.  Celerra has an advantage when working with files which contain high amounts of duplication in very small block sizes (like 50 bytes) since NetApp looks at 4KB chunks.  Celerra’s use of a more traditional compression engine saves more space in the syslog scenario but NetApp’s block level approach could save more space than Celerra when dealing with lots of large files.

The ability to work on traditional LUNs presents some interesting opportunities, especially in a VMWare/Hyper-V environment.  As I mentioned in my previous post, virtual environments have lots of redundant data since there are many systems potentially running the same operating system sharing the disk subsystem.  If you put 10 Windows virtual machines on the same LUN, de-duplication will likely save you tons of disk space on that LUN.  There are limitations to this that prevent the full benefits from being realized.  VMWare best practices require you to limit the number of virtual machine disks sharing the same SAN lun for performance reasons (VMFS locking issues) and A-SIS can only de-dupe data within a LUN but not across multiple LUNs.  So in a large environment your savings are limited.  NetApp’s recommendation is to use NFS NAS volumes for VMWare instead of FC or iSCSI LUNs because you can eliminate the VMFS locking issue and place many VMs on a single very large NFS volume which can then be de-duplicated.  Unfortunately there are limits on certain VMWare features when using NFS so this may not be an option for some applications or environments.  Specifically, VMWare Site Recovery Manager which coordinates site-to-site replication and failover of entire VMWare environments does not currently support NFS as of this writing.

When it comes to de-duplication’s impact on performance it’s kind of all over the map.  In backup applications, most target based systems either perform the work in memory while the data is coming in or as a post-process job that runs when the backups for that day have completed.  In either case, the hardware is designed for high throughput and performance is not really a problem.  For primary data, both EMC and NetApp’s implementations are post-process and do not generally impact write performance.  However, EMC has limitations on the size of files that can be de-duplicated before a modification to a compressed file causes a significant delay.  Since they also limit de-duplication to files that have not been accessed or modified for some period of time, the problem is minimal in most environments.  NetApp claims to have little performance impact to either read or writes when using A-SIS.  This has much to do with the architecture of the NetApp WAFL filesystem and how A-SIS interacts with it but it would take an entirely new post to describe how that all works.  Suffice it to say that NetApp A-SIS is useful in more situations than EMC’s Celerra De-duplication.

Where I do see potential problems with performance regardless of the vendor is in the same situation as thin provisioning.  If your application requires 1000 IOPS but you’ve only got 2 disks in the array because of the disk space savings from thin-provisioning and/or de-duplication, the application performance will suffer.  You still need to service the IOPS and each disk has a finite number of IOPS (100-200 generally for FC/SCSI).  Flash/SSD changes the situation dramatically however.

Right now I believe that de-duplication is extremely useful for backups, but not quite ready for prime-time when it comes to primary storage.  There are just too many caveats to make any general recommendations.  If you happen to purchase an EMC Celerra or NetApp FAS/IBM nSeries that supports de-duplication, make sure to read all the best-practices documentation from the vendor and make a decision on whether your environment can use de-duplication effectively, then experiment with it in a lab or dev/test environment.  It could save you tons of disk space and money or it could be more trouble than it’s worth.  The good thing is that it’s pretty much a free option from EMC and NetApp depending on the hardware you own/purchase and your maintenance agreements.

Capacity vs. Performance : Thin Provisioning

Posted on by

In my previous post, where I discussed the problem of unusable (or slack) disk space on a SAN, I promised a follow-up with techniques on how to increase storage utilization.  I realized that I should discuss some related technologies first and then follow that up with how to put it all together.  So today I start by talking about Thin Provisioning.  I will then follow up with an explanation of De-Duplication and finally talk about how to use multiple technologies together to get the most use out of your storage.

So what is Thin Provisioning?  It is a technology that allows you to create LUNs or Volumes on a storage device such that the LUN/Volume(s) appear to the host or client to be larger than they actually are.   In general, NAS clients and SAN attached hosts see “Thin Provisioned” LUNs just as they see any other LUN but the actual amount of disk space used on the storage device can be significantly smaller than the provisioned size.  How does this help increase storage utilization?  Well, with thin provisioning you provide applications with exactly the storage they want and/or need but you don’t have to purchase all of the disk capacity up front.

Let’s start with a comparison of using standard LUNs vs thin LUNs with a theoretical application set:

Say we have 3 servers, each running Windows Server.  The operating system partition is on local disk and application data drives are on SAN.  Each server runs an application that collects and stores data over time and the application owner expects that over the next year or so the data will grow to 1TB on each server.  In this particular case we also know that the application’s performance requirements are relatively low.

With traditional provisioning we might create 3 LUNs that are 1TB each and present them to the servers.  This provides the application with room for the expected growth.  Using 300GB FC disks we can carve out three 4+1 RAID5 sets, create one LUN in each and it would work fine.  Alternatively we could use wide striping (ie: a MetaLUN on EMC Clariion) and put all three LUNs on the same 15 disks.  Either way we’ve just burned 15 disks on the storage array based on uncertain future requirements.  If we were stingier with storage we could create smaller LUNs (500GB for example) and use LUN expansion technology to increase the size when the application data fills the disk to that capacity.

In the Thin Provisioning world we still create three 1TB LUNs but they would start out by taking no space.  The pool of disk that the LUNs get provisioned from doesn’t even need to have 3TB of capacity.  As the application data grows over the next 12 months or longer the pool size only needs to grow to accommodate the actual amount of data stored.  Depending on the storage array, we can add disks to the pool one at a time.  So on day one we start with 3 disks in the pool, and then add additional disks one by one throughout the year.  We can then create additional LUNs for other applications without adding disks.  As we add disks to the pool, we expand the capacity available for all of the LUNs to grow (up to each LUN’s maximum size) and we increase performance for ALL of the LUNs in the pool since we are adding spindles.  The real-world benefits come as we consolidate numerous LUNs into a single disk pool.

The nice thing about this approach is that we stop managing the size of individual LUNs and just manage the underlying disk pool as a whole.   And the cost-per-GB for SAN disk constantly goes down so we can spend only what we have to today, and when we add more later it will likely be a little cheaper.  Disk capacity utilization will be much higher in a thin model compared with the traditional/thick model.

The story gets even better in a virtual server environment such as with MS Hyper-V or VMWare ESX.  First, the virtual server OS drives are on the SAN in addition to the application data, and there can be multiple virtual disks on the same LUN.  Whether physical or virtual, we need to maintain some free space in the disks to keep applications running, plus with virtual systems we need some free space on the LUN for features of the virtualization technology like snapshots.  The net effect is that in a virtualized environment, disk utilization never gets much above 50% when slack space at both the virtual layer and inside the virtual servers is considered.  With thin provisioning we could potentially store twice the number of virtual servers on the same physical disks.

There are caveats of course.  Maintaining performance is the primary concern.  Whether used in a thick LUN or thin LUN, each disk has a specific amount of performance.   Thin provisioning has no effect on the amount of IOPS or bandwidth the application requires nor the amount of IOPS the physical disk can handle.  So even if thin provisioning saves 50% disk space in your environment, you may not be able to use all of that reclaimed space before running into performance bottlenecks.  If the storage array has QOS features (ie: EMC Clariion NQM) it is possible to prioritize the more important applications in your disk pool to maintain performance where it matters.

Other problems that you may encounter have to do with interoperability.  For starters, some applications are not “thin-friendly”; ie: they write data in such a way as to negate any benefit that thin provisioning provides.  Also, while many storage arrays support thin provisioning, each has different rules about the use of thin LUNs.  For example, in some scenarios you can’t replicate thin LUNs using native array tools.  It pays to do your homework before choosing a new storage array or implementing thin provisioning.

I didn’t cover thin provisioning in NAS environments directly but the feature works in the same manner.  Thin volumes are provisioned from pools of storage and users/clients see a large amount of available disk space even if the disk pool itself is very small.  Since NAS is traditionally used for user home directories and departmental shares, absolute performance is usually not as much of a concern so thin provisioning is much easier to implement and in many cases is the default behavior or simply a check box on NAS appliances like EMC Celerra or NetApp FAS.

Thin provisioning is a powerful technology when used where it makes sense.  In my next post I’ll explain de-duplication technology and then talk about how these technologies can be used together plus some workarounds for the caveats that I’ve mentioned.